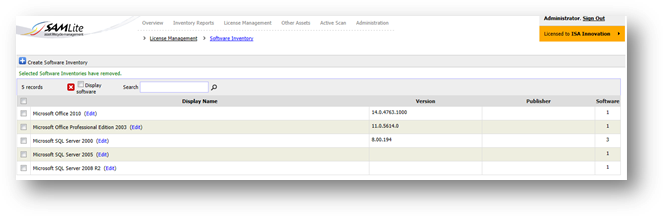
Export current machine to Excel
You
may export the details to excel for your own reporting needs by clicking on  “Export to excel”.
The resulted excel file will contain all information similar to what is shown
at your machine details reporting page.
“Export to excel”.
The resulted excel file will contain all information similar to what is shown
at your machine details reporting page.
You may also export the details of all the selected machines
shown on the left pane by clicking . The resulted excel file will contain
all information of those machines listed on the left pane.
. The resulted excel file will contain
all information of those machines listed on the left pane.
Export current machine to PDF
Besides saving your report in Excel format, you may prefer
to see your reporting as it is shown on SAMLite page; you may click on .
.
Export all selected machines to PDF
Click on  will allows you to export machines
details into .pdf format for all the machines selected on the left pane in one
report.
will allows you to export machines
details into .pdf format for all the machines selected on the left pane in one
report.
Hide/Show Details
Click on will allow you to hide/shown all the
machine details. When details are hidden, all you see are the headers of the
panel. You may choose to show all details by clicking onagain or
click on the header that you would like to see its details.
will allow you to hide/shown all the
machine details. When details are hidden, all you see are the headers of the
panel. You may choose to show all details by clicking onagain or
click on the header that you would like to see its details.
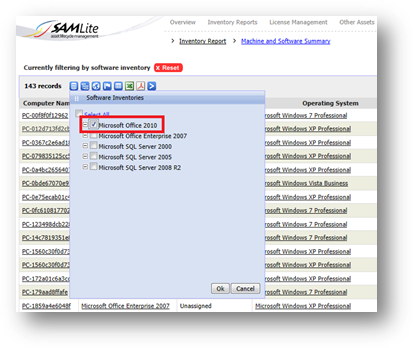
To see a list of software collected from all machines, go to
Software Summary in Inventory Reports. You will see something similar to
the following:
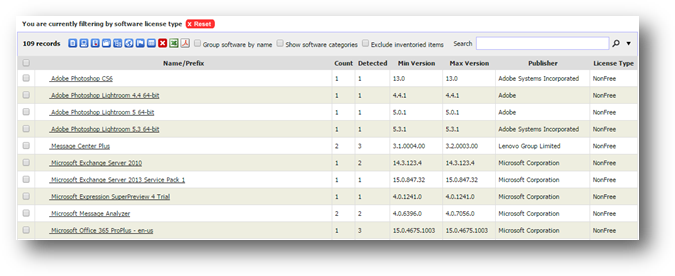
|
Item
|
Description
|
|
Name/Prefix
|
Software name or prefix (first word(s)
of software name).
|
|
Count
|
Number of different versions with the
name/prefix
|
|
Detected
|
Number of detected machines with the
software with that name/prefix
|
|
Min Version
|
Minimum version for name/prefix
|
|
Max Version
|
Maximum version for name/prefix
|
|
Publisher
|
Publisher (blank if name/prefix covers
software with different publishers)
|
|
License Type
|
License Type (blank if name/prefix
covers software with different license types)
|
|
Categories
|
Software categories (blank if
name/prefix covers software with different software categories)
|
|
Group software by name
|
Select to group software by
name/words.
|
|
Show software categories
|
Select to show software categories
|
|
Exclude inventoried items
|
Select to exclude software that’s
already added to a software inventory group.
|
|

|
Search by Name, Publisher and License
Type.
|
|

|
Show details of selected software
|
|

|
Show machines with selected software
|
|

|
Filter software by software license
type
|
|

|
Filter software by software category
|
|

|
Filter software by department
|
|

|
Filter software by location
|
|

|
Filter software by machine status
|
|

|
Filter software by first discovered
date
|
|

|
Delete selected software
|
|
|
Export results to Excel readable
format
|
|

|
Export results to PDF
|
See software details
You
may check the checkbox of one or more records then click on “Show details of selected
software”. Doing this will bring you to see the selected software details. By
selecting multiple software titles before seeing the details provide you a convenient
way to browse through each software details of your interest without having you
to go back to software summary too frequent to re-select them.
See installed
machine
Select
one or more software records and then click on to “show machines with selected
software”. On the result page, select a software title on the left Software pane
to see a list of machines with that specific version of the software. Selecting
multiple software titles lists only machines with all of the selected software.
Filter software by
department
Click
on “Filter
software by department” to filter your viewing software list to show only
software that are from machines of the selected departments. You can select one
or more departments. The department is grouped by company (shown in bold).
Filter software by
location
Click
on “Filter
software by location” to filter your viewing software list to show only
software that are from machines of the selected locations. You can select one
or more locations.
Filter software by
machine status
Click
on “Filter
software by machine status” to filter your viewing software list to show only
software that are from machines of the selected status. You can select one or
more status.
Filter record by
first discovered date
Click
on “Filter record
by first discovered date” to filter your viewing to the date you specified
based on the first discovered date.
“Filter record
by first discovered date” to filter your viewing to the date you specified
based on the first discovered date.
Delete software
To
delete machine(s), the user must have software moderator rights. See assign
user role for more details. Select one or more software and then click to delete. Selected
software will be deleted from the system. However, historical information of
the software will be retained for record purposes and can be manually deleted
separately.
Search
You
may search for software by typing in text to search for and clicking the search
button . By
default the searched fields include Display Name, Publisher, License Type and
First Discovered Date. To change the search fields click on
. By
default the searched fields include Display Name, Publisher, License Type and
First Discovered Date. To change the search fields click on  .
.
Export to excel
Click
at the top of
the report table to export the software summary report to a format that can be
opened by Microsoft excel. SAMLite will export all records instead of only
those records currently shown in the page.
Export to PDF
Click  to export the software summary report as
a PDF file.
to export the software summary report as
a PDF file.
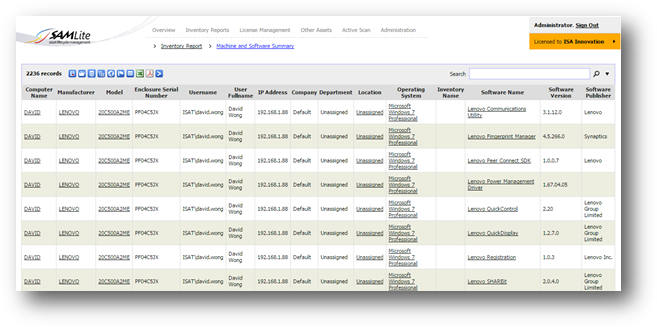
To
see the list of machines and their installed software, go to Machine and
Software Summary under Inventory Reports. If no software inventory has been
created the Machine and Software Summary by default will show all machines and
all the software in each machine.
If Software
Inventory groups have been created, the report by default will show all
machines and only the software in Software Inventory groups.
 You
can customize the summary report by clicking
You
can customize the summary report by clicking  to select specified columns you wish
to have for your report. Aggregate columns like Machine Count and Software
Count can be added, so for example to generate a report that lists the number
of machines for each software by Department you would remove all the columns
and then add the following columns: Department, Software Name and Machine
Count. For a similar report but with Software Inventory, you would use
Inventory Name instead of Software Name.
to select specified columns you wish
to have for your report. Aggregate columns like Machine Count and Software
Count can be added, so for example to generate a report that lists the number
of machines for each software by Department you would remove all the columns
and then add the following columns: Department, Software Name and Machine
Count. For a similar report but with Software Inventory, you would use
Inventory Name instead of Software Name.
Filter by Software
License Type
Click
on “Filter
software by license” to pick the license types (Add On, Free, NonFree and
Unknown) for the software to be included in the report. By default all license
types are selected. The “NonFree” license type is for software that normally
requires payment and is the main item for licensing purposes. “Free” is for
software that normally does not require payment. The “Add On” license type is
for software that is not free but not the main software for licensing purposes.
“Unknown” is for software which the license type is unknown to the system (the
system uses rules to assign categories and license types to software).
Filter by Software Category
Click
on “Filter
software by category” to pick the software categories of software to be
included in the report. By default no categories are selected. Selecting
multiple categories will restrict the report to software that belongs to all
selected categories.
Filter by Software
Inventory
Click
on  “Filter by Software Inventory” you can
see by default all inventories already been selected. You can deselect those by
clicking on the check box to view only those machines with the inventory you
interested in.
“Filter by Software Inventory” you can
see by default all inventories already been selected. You can deselect those by
clicking on the check box to view only those machines with the inventory you
interested in.
Filter by
department
Click
on “Filter
software by department” to filter your viewing software list to show only
software that are from machines of the selected departments. You can select one
or more departments. The department is grouped by company (shown in bold).
Filter by location
Click
on “Filter
software by location” to filter your viewing software list to show only
software that are from machines of the selected locations. You can select one
or more locations.
Filter by machine
status
Click
on “Filter
software by machine status” to filter your viewing software list to show only
software that are from machines of the selected status. You can select one or
more status.
Filter record by
first discovered date
Click
on “Filter
record by first discovered date” to filter your viewing to the date you
specified based on the first discovered date.
Export to excel
Click
at the top of
the report table to export the entire machine software summary report to a
format that can be opened by Microsoft excel. The exported file will be in .xls
format. SAMLite will export all records instead of only those records currently
shown in the page.
Export to PDF
Click to export the entire machine software
summary report to the same format as it is shown in the page. The exported file
will be in .pdf format.
Example 1: Create software
inventory to generate more effective report.
If
you do not create any software inventory before, Hardware Software Summary
shows a whole list of machines with all software installed in it. From the
figure below, you can see the number of records is very big and the panel for
“Filter by Software Inventory” is blank.

List showing
machines with all software installed in it.
** Please refer to License
Management Documentation on how to create a software inventory.
Software
Inventory created under License Management.
Go back to Machine Software
Summary page to find your report is currently filtered by the software
inventory you have created.

List of
Machines filtered by software inventory.
Example 2: You can get a detailed report of how many machines
installed with Microsoft Office 2010 which are from IT department.
Select only
the software inventory you wish to view
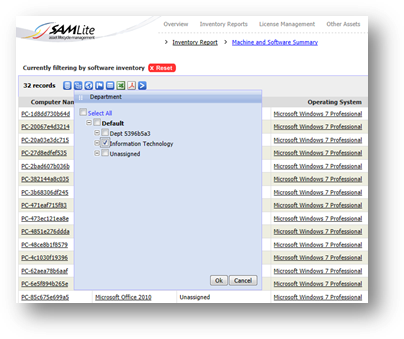
Further
filter with machines from certain department.
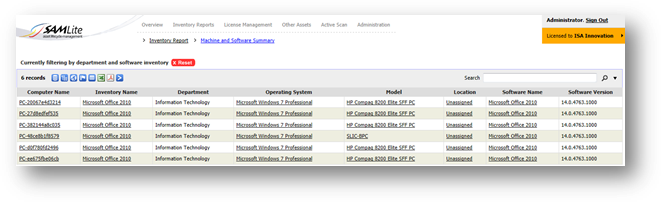
Report of
machines from IT department with Microsoft Office 2010 installed.
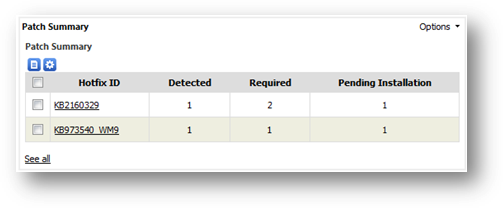
To
see the master list of patches collected by SAMLite, go to Patch Summary
under Inventory Reports. The summary report contains the list of patches with
general details like Hotfix ID, detected, required and outstanding. Column
“Detected” shows the number of machines that have installed the patch. Column
“Required” shows the number of machines that are required to install the patch,
have already installed it. The required machines are determined and configured
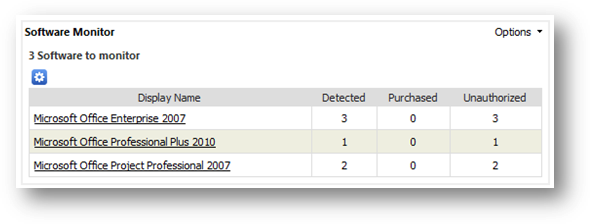
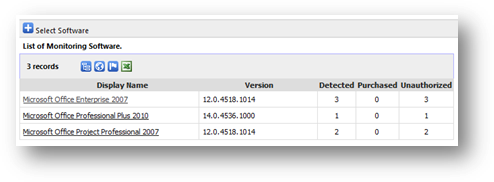
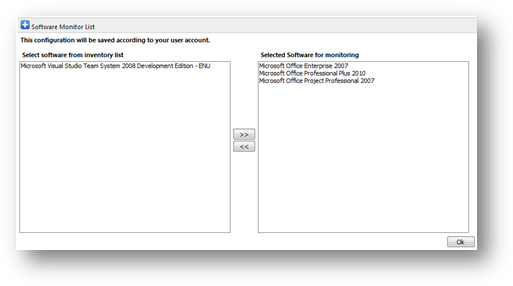
by you or any user from “Monitor software” section under your Overview page.
Column “Outstanding” shows the number of pending machines that are required to
install the patch.
The
summary report shows the total number of machines being collected thus far at
the top left of the table. The page is limited to 20 machines per view. To see
the rest of the machines, click on the page number at the bottom of the report
table. Each column/detail is sortable by alphabetical order (A-Z) or (Z-A). You
may click on the column header to sort that particular column.

See
patch details
You
may check on the checkbox of one or more software records then click on “See patch
details”. Doing this will bring you to see the selected patch details. By
selecting multiple patches before seeing the details provide you a convenient
way to browse through each patch details of your interest without having you to
go back to patch summary too frequent to re-select them.
Filter by
outstanding records
Select
the option “show outstanding records only” from the drop down box to filter
patches that are monitored by all users. See monitor software and patches for
more details. The filtered list will be the patches that contains a non-zero
value under “Required” or “Outstanding” columns.
Filter patch by
department
Click
on “Filter
patch by machine department” to filter your viewing patch list to show only
patch that are from machines of the selected departments. You can select one or
more departments. The department is grouped by company (shown in bold).
Filter patch by
location
Click
on “Filter
patch by machine location” to filter your viewing patch list to show only patch
that are from machines of the selected locations. You can select one or more
locations.
Search
You
may search for patches by typing in the patch name into the search box and
clicking the search button . It will only search by patch name.
Export to excel
Click
at the top of
the report table to export the entire patch summary report to a format that can
be opened by Microsoft excel. The exported file will be in .xls format. SAMLite
will export all records instead of only those records currently shown in the
page.
Export to PDF
Click to export the entire machine summary
report to the same format as it is shown in the page. The exported file will be
in .pdf format.
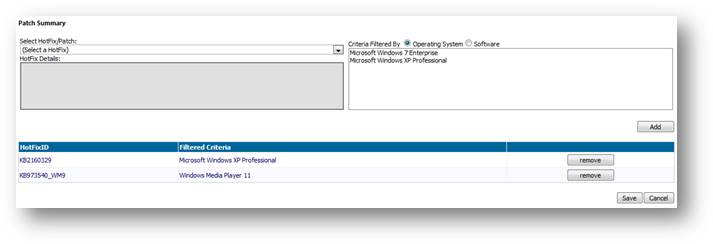
Select patch to monitor
To
select the hotfix to be monitored, click  “Select patch to monitor”. It will
lead you to a page that allows you to add hotfix into the monitoring list.
“Select patch to monitor”. It will
lead you to a page that allows you to add hotfix into the monitoring list.
Here
are the steps to add hotfix:
5.
Select the hotfix name from the “Select a
Hotfix” drop down list.
6.
The selected hotfix will be shown at the left
pane.
7.
Select either operating system or software
that is required to be installed with the selected software at the right
pane.
8.
Click “Add” button to add the selected hotfix to
the monitoring list.
Here
are the steps to remove hotfix:
3.
Click “Remove” button of the selected hotfix.
4.
The monitoring list will be updated immediately.
Figure
below shows a sample of this.
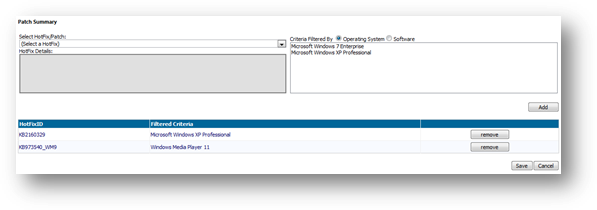
Click
“Save” button to save your changes and exit the page.
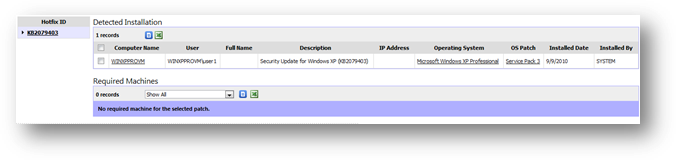
Patch
details can be accessed from multiple places. For example, you can see a
patch’s details by clicking on its name (hyperlink) from patch summary. The
details report can accommodate more than one patch, while only show one patch
details is visible at a time. You will see the list of patches (for example,
selected patches from patch summary) on the left pane. Clicking on a patch name
will show you its details in two sections- Detected installation and required
machines.
Detected
installation shows the list of machine that has installed the patch. Other
details like patch description, machine IP address, and installed date are also
shown in the report.
Required
machines show the list of machine that you or other users have configured
to monitor. You can configure patches that are required to be installed on any
particular machine from “Monitor Software” of your Overview page. You may
filter the records by outstanding machines (Show machine not installed only)
and complied machines (Show machine installed only) from the given drop down
box.
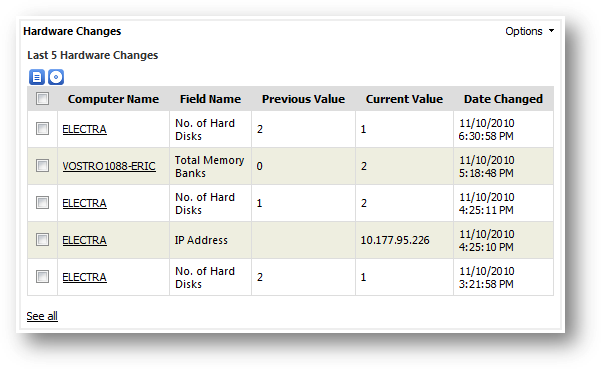
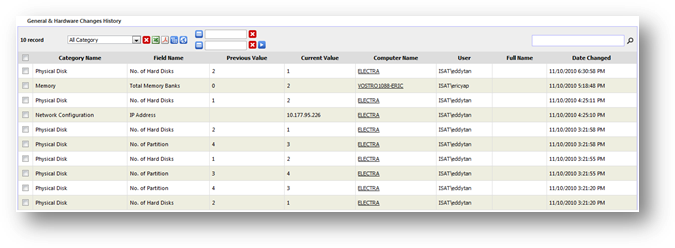
Hardware
history shows the historical general and hardware information changes that
happen in your organization over time. The types of changes tracked by SAMLite
are as follow:
·
Location and departments
·
Operating system
·
Physical disk
·
Memory
·
Processor
·
User
·
Network configuration
·
Computer hostname
·
Domain
The
changes are tracked on each machine during machine inventory update. The
changes of a machine are reported by comparing the differences of current
hardware and general information from the current information saved in the
system.
You
can access hardware history from “General & Hardware History” from
Inventory Report page. You may find records of changes that were detected by
selecting a date or a range of dates from the search calendar. You may filter
the records by selecting one of the change categories from the drop down box.
Filter machine by
department
Click
on “Filter
machine by department” to filter your viewing history list to show only history
record that are from machines of the selected departments. You can select one
or more departments. The department is grouped by company (shown in bold).
Filter machine by
location
Click
on “Filter
machine by location” to filter your viewing history list to show only history
record that are from machines of the selected locations. You can select one or
more locations.
Search
You
may search for any information by typing in the search criteria into the search
box and clicking the search button.
Export to excel
Click
at the top of
the report table to export the entire hardware history report to a format that
can be opened by Microsoft excel. The exported file will be in .xls format. SAMLite
will export all records instead of only those records currently shown in the
page.
Delete historical
record
Select
one or more historical record and click “Delete selected record” (beside
export to excel icon) to delete them.

In this page you can generate GeoLocation history reports.
The search field supports query for “latitude longitude”
(select the appropriate radius with the Search radius drop-down). Select
“Invert search” to look for records that do not match the search.
The default date range is one month.
The Source column indicates whether the GeoLocation query
was done at the client or at the SAMLite server.
The Accuracy column is an estimate on how accurate the
GeoLocation guess is. The Change is the distance in km from the previous
position. GeoLocation are the latitude and longitude of the guessed location.
The Assigned Location is the Location that the machine has
been assigned to (e.g. Administration, Location, Assign machine to location).
The Address, Postcode, State and Country columns are guessed
address information.
To update machine information, SAMLite scans produce XML
scan files which are imported by the SAMLite import service.
To view the import status of these files and related information
go to Import History in Inventory Reports. You should see a report similar
to the following:

By default the report is filtered by Import Time – only
records up to 1 day old are shown.
Click on the icon to filter
by Import Status:
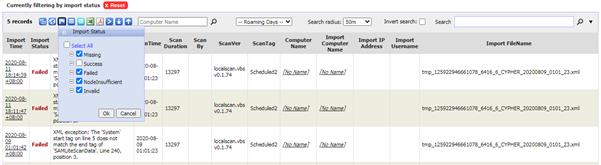
Click on to filter
by Import Time and  to filter by
Scan Time.
to filter by
Scan Time.
Import Time is the time the scan file was processed by the
SAMLite Import Service.
Scan Time is the time at the computer when the scan file was
created.
To filter by computer name enter a computer name into the Computer
Name field and click on: 
To periodically delete Import History (and reduce storage usage),
enable Status History Maintenance in Administration, Maintenance
Settings, and set the Maximum Status History Days.
To view Machine OS History, go to Machine OS History
in Inventory Reports. You should see a report similar to the following:

OSH stands for OS History.
By default the report is filtered by Import Time and only records
up to 1 day old are shown.
Click on to filter
by Import Time and to filter by
Scan Time. Import Time is the time the scan file was processed by the SAMLite
Import Service. Scan Time is the time at the computer when the scan file was
created.
To filter by computer name enter a computer name into the Computer
Name field and click on:
Normally OS Performance information is not collected or
shown e.g. OSH Available Bytes, OSH Pages Output/s will be blank.
To collect additional OS Performance information set GetOSPerf=1
in the SAMScanConfig.txt file for the relevant localscan.vbs script.
For more information on the SAMScanConfig.txt file please
refer to SAMLite Installation and Initial Setup.pdf .
To periodically delete Machine OS History (and reduce
storage usage), enable Status History Maintenance in Administration,
Maintenance Settings, and set the Maximum Status History Days.
To view Machine Process History, go to Machine Process
History in Inventory Reports. You should see a report similar to the
following:

By default the report is filtered by Import Time and only
records up to 1 day old are shown.
Click on to filter
by Import Time and to filter by
Scan Time. Import Time is the time the scan file was processed by the SAMLite
Import Service. Scan Time is the time at the computer when the scan file was
created.
To filter by computer name enter a computer name into the Computer
Name field and click on:
Normally additional process file information is not
collected or shown e.g. Process File Description, Bytes, Process File Company will
be blank. But Process File Version will be collected if available.
To collect additional file information set GetProcFileDetails=1
in the SAMScanConfig.txt file for the relevant localscan.vbs script.
Process performance information is also not collected by
default. To collect Process Performance information set GetProcPerf=1 in the SAMScanConfig.txt
file for the relevant localscan.vbs script.
For more information on the SAMScanConfig.txt file please
refer to SAMLite Installation and Initial Setup.pdf.
To periodically delete Machine Process History (and reduce
storage usage), enable Status History Maintenance in Administration,
Maintenance Settings, and set the Maximum Status History Days.
To view Machine Event History, go to Machine Event
History in Inventory Reports. You should see a report similar to the
following:

By default the report is filtered by Import Time and only
records up to 1 day old are shown.
Click on to filter
by Import Time and to filter by
Scan Time. Import Time is the time the scan file was processed by the SAMLite
Import Service. Scan Time is the time at the computer when the scan file was
created.
To filter by computer name enter a computer name into the Computer
Name field and click on:
To filter by Event Log (e.g. System or Application), enter
the desired search patterns separated by commas into the Event Log File
Pattern field. Prefix the patterns with a minus sign to exclude records
matching that pattern.
To filter by Event Source (e.g. Kernel-General or
Kernel-Power) enter the desired search patterns separated by commas into the Event
Source Pattern field. Prefix the patterns with a minus sign to exclude records
matching that pattern.
To filter by Event IDs, enter the desired event IDs or event
ID ranges separated by commas into the Event ID List field. Prefix items
with a minus sign to exclude that ID or range.
Examples:
137, 140, 6008 will include events with Event IDs=137, 140
or 6008. 137-140 will include events with Event IDs = 137, 138, 139 or 140.
-137 will exclude events with Event ID = 137. -137-140 will
exclude events with Event IDs = 137, 138, 139 or 140.
Normally only events from the system log related to
shutdown, startup, wake, sleep and time changes are gathered, along with
Warning and Error level events from kernel, disk, Ntfs and FailoverClustering
event sources.
To collect additional event information you will need to
configure the SAMScanConfig.txt file. Please refer to Event Log Advanced
Settings in SAMLite Installation and Initial Setup.pdf.
To periodically delete Machine Process History (and reduce
storage usage), enable Status History Maintenance in Administration,
Maintenance Settings, and set the Maximum Status History Days.
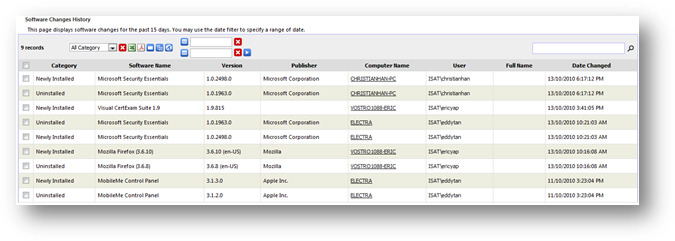
Software
history shows the historical software information changes that happen in your
organization over time. The types of changes tracked by SAMLite are as follow:
·
Newly installed software
·
Uninstalled software
The
changes are tracked on each machine during machine inventory update. The
changes of a machine are reported by comparing the differences of latest
software installed collected by SAMLite with the current list of installed
software saved in the system.
You
can access software history from “Software History” from Inventory Report page.
You may find records of changes that were detected by selecting a date or a
range of dates from the search calendar. You may filter the records by
selecting one of the change categories from the drop down box.
Filter machine by
department
Click
on “Filter
machine by department” to filter your viewing history list to show only history
record that are from machines of the selected departments. You can select one
or more departments. The department is grouped by company (shown in bold).
Filter machine by
location
Click
on “Filter
machine by location” to filter your viewing history list to show only history
record that are from machines of the selected locations. You can select one or
more locations.
Filter software by
view
Click
on  “Filter software by view” to filter
your viewing history list to show only history record that are from software of
the selected views. You can select one or more views.
“Filter software by view” to filter
your viewing history list to show only history record that are from software of
the selected views. You can select one or more views.
Search
You
may search for any information by typing in the search criteria into the search
box and clicking the search button.
Export to excel
Click
at the top of
the report table to export the entire software history report to a format that
can be opened by Microsoft excel. The exported file will be in .xls format. SAMLite
will export all records instead of only those records currently shown in the
page.
Delete historical
record
Select
one or more historical record and click “Delete selected record” (beside
export to excel icon) to delete them.
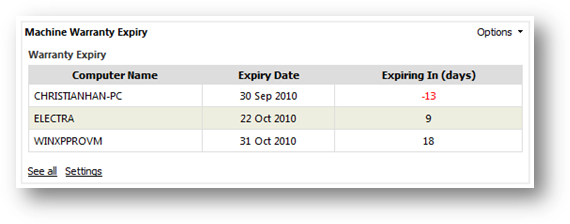
SAMLite
helps you to manage the lifecycle of your organization’s machine/workstations
by keeping track of their warranty expiry date. Keeping track these date
enable the administrator to be aware of when her machines are due for warranty
expiry. SAMLite will also alert the administrator at the Overview page when the
expiry date is near. You can configure how many days before the expiry date you
want SAMLite to raise the alert.
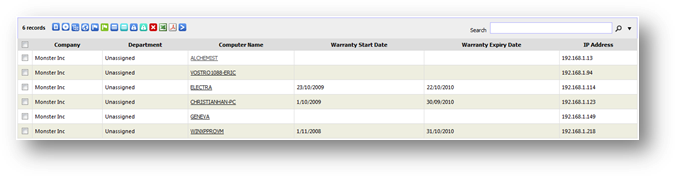
To
view machine warranty expiry summary report, go to Machine Expiry Summary from
Inventory Report page then click on Warranty Expiry link. From the page,
you can see list of machine with its warranty start date, expiry date and the
remaining days before the warranty is expired.
See machine details
There
are two ways you can see machine details. You may check on the checkbox of one
or more machine records then click on “See machine details”. Or you can
directly click on the machine name which appears to be a hyperlink. Either way
will bring you to see the selected machine details; with the latter will only
limit you to see only one machine details.
See installed
software
Select
one or more machine records and then click on  “See software installed. On the result
page, select a computer name on the left pane to see its installed software.
Selecting multiple computer names will show you the list of common software
being installed on those selected machines.
“See software installed. On the result
page, select a computer name on the left pane to see its installed software.
Selecting multiple computer names will show you the list of common software
being installed on those selected machines.
Filter machine by
department
Click
on “Filter
machine by department” to filter your viewing machine to only from those
departments you want to see. You can select one or more departments. The
department is grouped by company (shown in bold).
Filter machine by
location
Click
on “Filter
machine by location” to filter your viewing machine to only from those
locations you want to see. You can select one or more locations.
Filter machine by
status
Click
on “Filter
machine by status” to filter your viewing machines to those from the selected
status only. You can select one or more status from the status list.
Set machine status
Select
one or machines and then click  “Set machine status” to tag them to
one of the status (Active, Inactive and Expired).
“Set machine status” to tag them to
one of the status (Active, Inactive and Expired).
Filter record by
first discovered date
Click
on “Filter
record by first discovered date” to filter your viewing to the date you
specified based on the first discovered date.
Filter record by
last discovered date
Click
on “Filter
record by last discovered date” to filter your viewing to the date you
specified based on the last discovered date.
“Filter
record by last discovered date” to filter your viewing to the date you
specified based on the last discovered date.
Filter machine by
warranty status
Click
on  “Filter
machine by warranty status” allow you to view your report based on machine
warranty status. Status available for selection is Expired and Not
Expired. You can select one or more status.
“Filter
machine by warranty status” allow you to view your report based on machine
warranty status. Status available for selection is Expired and Not
Expired. You can select one or more status.
Filter machine by
lease status
Click
on  “Filter
machine by lease status” allow you to view your report based on machine lease
status. Status available for selection is Expired and Not Expired.
You can select one or more status.
“Filter
machine by lease status” allow you to view your report based on machine lease
status. Status available for selection is Expired and Not Expired.
You can select one or more status.
Delete machine
To
delete machine(s), the user must have machine moderator rights. See assign user
role for more details. Select one or more machines and then click to delete. All
installed software and hardware information about the selected machines will be
deleted from the system. However, historical information of the machine will be
retained for record purposes and can be manually deleted separately.
Search
You
may search for computer name or other details by typing in the search criteria
and clicking the search button. It will search by computer name by
default. To search for machine details, type in the search criteria and select
“Search in all columns” checkbox from  “Search options”. When searching in
all columns, the search will find in all selectable columns including the
hidden columns besides the column you have chosen to display.
“Search options”. When searching in
all columns, the search will find in all selectable columns including the
hidden columns besides the column you have chosen to display.
Export to excel
Click
at the top of
the report table to export the entire machine summary report to a format that
can be opened by Microsoft excel. The exported file will be in .xls format. SAMLite
will export all records instead of only those records currently shown in the
page.
Export to PDF
Click to export the entire machine summary
report to the same format as it is shown in the page. The exported file will be
in .pdf format.
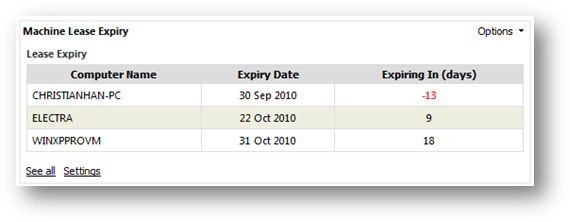
SAMLite
helps you to manage the lifecycle of your organization’s machine/workstations
by keeping track of their lease expiry date. Keeping track these date
enable the administrator to be aware of when to renew her machines or to
decommission them. SAMLite will also alert the administrator at the Overview
page when the expiry date is near. You can configure how many days before the
expiry date you want SAMLite to raise the alert.
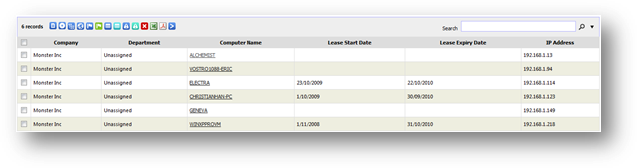
To
view machine lease expiry summary report, go to Machine Expiry from
Inventory Report page and then click on Lease Expiry link. From the
page, you can see list of machine with its lease start date, expiry date and
the remaining days before the machine leasing is expired.
See machine details
There
are two ways you can see machine details. You may check on the checkbox of one
or more machine records then click on “See machine details”. Or you can
directly click on the machine name which appears to be a hyperlink. Either way
will bring you to see the selected machine details; with the latter will only
limit you to see only one machine details.
See installed
software
Select
one or more machine records and then click on “See software installed. On the result
page, select a computer name on the left pane to see its installed software.
Selecting multiple computer names will show you the list of common software
being installed on those selected machines.
Filter machine by
department
Click
on “Filter
machine by department” to filter your viewing machine to only from those
departments you want to see. You can select one or more departments. The
department is grouped by company (shown in bold).
Filter machine by
location
Click
on “Filter
machine by location” to filter your viewing machine to only from those
locations you want to see. You can select one or more locations.
Filter machine by
status
Click
on “Filter
machine by status” to filter your viewing machines to those from the selected
status only. You can select one or more status from the status list.
Set machine status
Select
one or machines and then click “Set machine status” to tag them to
one of the status (Active, Inactive and Expired).
Filter record by
first discovered date
Click
on “Filter
record by first discovered date” to filter your viewing to the date you
specified based on the first discovered date.
Filter record by
last discovered date
Click
on “Filter
record by last discovered date” to filter your viewing to the date you
specified based on the last discovered date.
Filter machine by
warranty status
Click
on “Filter
machine by warranty status” allow you to view your report based on machine
warranty status. Status available for selection is Expired and Not
Expired. You can select one or more status.
Filter machine by
lease status
Click
on “Filter machine by lease status” allow
you to view your report based on machine lease status. Status available for
selection is Expired and Not Expired. You can select one or more
status.
Delete machine
To
delete machine(s), the user must have machine moderator rights. See assign user
role for more details. Select one or more machines and then click to delete. All
installed software and hardware information about the selected machines will be
deleted from the system. However, historical information of the machine will be
retained for record purposes and can be manually deleted separately.
Search
You
may search for computer name or other details by typing in the search criteria
and clicking the search button. It will search by computer name by
default. To search for machine details, type in the search criteria and select
“Search in all columns” checkbox from “Search options”. When searching in
all columns, the search will find in all selectable columns including the
hidden columns besides the column you have chosen to display.
Export to excel
Click
at the top of
the report table to export the entire machine summary report to a format that
can be opened by Microsoft excel. The exported file will be in .xls format. SAMLite
will export all records instead of only those records currently shown in the
page.
Export to PDF
Click to export the entire machine summary
report to the same format as it is shown in the page. The exported file will be
in .pdf format.
You
can configure the report to alert you with machines that are expiring
soon. You can tell SAMLite to show you machines with warranty and lease expiry
date that are close to the number of days you specified. To see these alerts at
Overview page, you must add Machine Warranty Expiry and Machine Lease
Expiry to your personalized overview page.
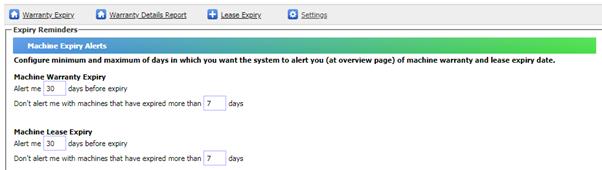
To
configure your alert settings, go to Settings link from Machine Expiry page.
There are two sections to configure. One is to configure days for machine
warranty expiry, and another one is to configure days for machine lease
expiry. Type in the number of days for each sections and then save your
settings.
You
may also configure to stop alerting machines that have expired. For example,
you can configure SAMLite to stop alerting you with machines that have expired
more than 10 days.
By
default, SAMLite will alert you 30 days before expiry, and stop alert for
machines expired more than 7 days. See figure below for a sample setting.
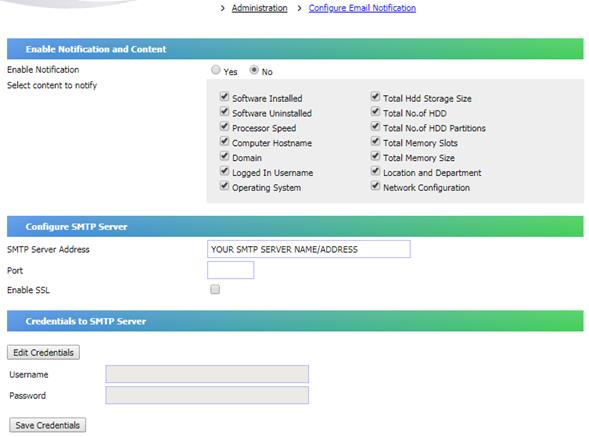
In the next section you can configure email alerts to notify
you of machine warranty or lease expiry. 
Note: For email alerts to work you MUST
configure suitable SMTP Server settings in Administration, Configure email
notification, Configure SMTP Server, SMTP Server Address.
SAMLite
helps you to manage the lifecycle of your organization’s software by keeping
track of their expiry date. Keeping track these date enable the
administrator to be aware of when her software are due for expiry. SAMLite will
also alert the administrator at the Overview page when the expiry date is near.
You can configure how many days before the expiry date you want SAMLite to
raise the alert.
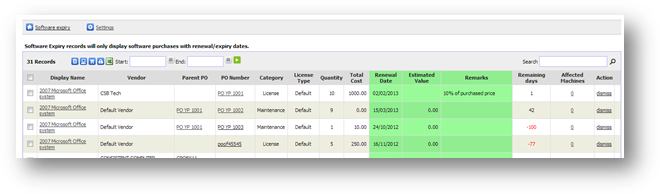
To
view software expiry summary report, go to Software Expiry Summary from Inventory
Report page. From the page, you can see list of software with its expiry date,
the remaining days before they are expire, which PO they are tied to, the
renewal details and number of machine(s) will be affected.
See software details
There
are two ways you can see software details. You may check on the checkbox of one
or more software records then click on “See software details”. Or you can
directly click on the software name which appears to be a hyperlink. Either way
will bring you to see the selected software details; with the latter will only
limit you to see only one software details.
See installed
machine
Select
one or more software records and then click on “See machine detected installed with
this software”. On the result page, select a software title on the left pane to
see its installed machine. Selecting multiple software titles will show you the
list of machines being installing all selected software.
Filter software by
expiry mode
Click
on  “Filter software
by expiry mode” to filter your viewing software to those from the selected
modes only. Available expiry modes are expired and non-expired mode. You can
select one or more modes from the status list.
“Filter software
by expiry mode” to filter your viewing software to those from the selected
modes only. Available expiry modes are expired and non-expired mode. You can
select one or more modes from the status list.
Search
You
may search for records by typing in the search criteria and clicking the search
button.
Export to excel
Click
at the top of
the report table to export the entire software expiry report to a format that
can be opened by Microsoft excel. The exported file will be in .xls format. SAMLite
will export all records instead of only those records currently shown in the
page.
You
can configure the report to alert you with software that is expiring
soon. You can tell SAMLite to show you software with support date that is close
to the number of days you specified. To see these alerts at Overview page, you
must add Software Expiry to your personalized overview page.
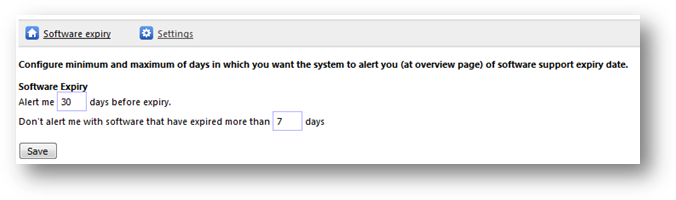
To
configure your alert settings, go to Settings link from Software Expiry page.
You can type in the number of days you wish to be alerted before the expiry.
You
may also configure to stop alerting software that has expired. For example, you
can configure SAMLite to stop alerting you with software that has expired more
than 10 days.
By
default, SAMLite will alert you 30 days before expiry, and stop alert for
software expired more than 7 days. See figure below for a sample setting.
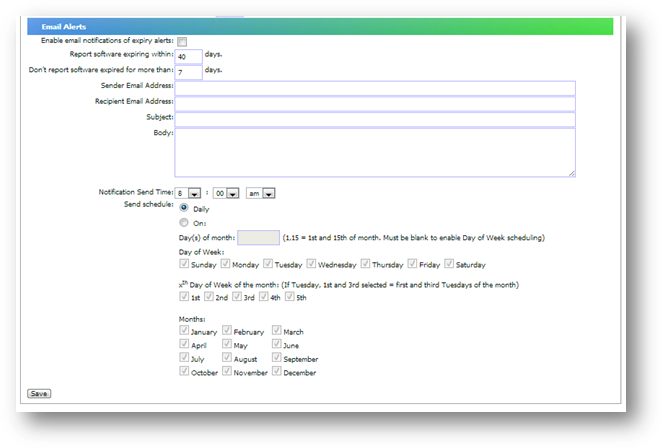
You may also get alerted via email by checking the
checkbox “Enable email notifications of expiry alerts”. You also need to ensure
the SMTP Server setting in “System Settings, Configure Email Notification” is
set correctly.
As
shown below, you can choose to have an email notification daily or you can
schedule a date to receive the email as you wish to. By default, the email will
report the software expiring within 40 days and stop reporting those have
expired more than 7 days.
Statistics
pages give you a top-level view of your hardware and general information on
specific area of your inventory. You can see the list of statistic provided by SAMLite
under “Statistics” from the Inventory Report page. The provided statistic areas
are as follow:
·
Operating system and patch
·
Location
·
Computer model
·
Hard disk storage
·
System manufacturer
·
Domain
This
statistic gives you an overall view of the types of operating systems found in
your inventory. It gives you a graph view of each operating system and the
number of machines being detected having that operating system. You can access
this statistic page by following “Operating System” icon from Statistics Menu.
Below
is a sample graph of operating system. On the left of the graph is the name of
the operating system while the figure on the right shows number of machines
being detected installed with that operating system.
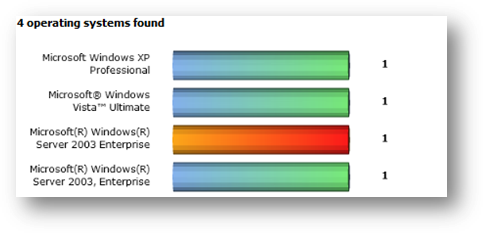
You may click on any bar on the graph to see the list of
machines having that operating system. Bar in orange-red indicate the currently
selected operating system.
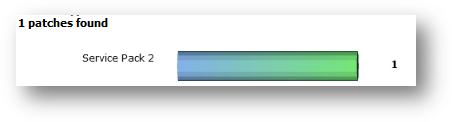
On
the right of the graph, shows the patch version found in your inventory. Figure
below shows a sample of operating system patch for Microsoft Windows Server
2003 Enterprise. You may click on the patch bar to see list of machines of Microsoft
Windows Server 2003 Enterprise with service pack 2.
This
statistic gives you an overall view of all the locations being added into the
system. It gives you a graph view of each location and the number of machines
being assigned to the location. You can access this statistic page by following
“Location” icon from Statistics Menu.
Below
is a sample graph of location. On the left of the graph is the name of the
location while the figure on the right shows number of machines being assigned
to it.
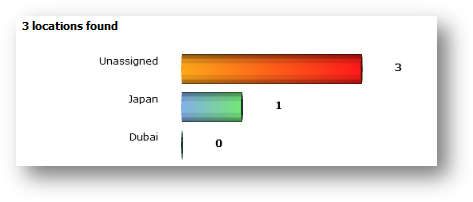
You
may click on any bar on the graph to see the list of machines under that
location. Bar in orange-red indicate the currently selected location.
This
statistic gives you an overall view of the every computer model being detected
by SAMLite. It gives you a graph view of each model and the number of machines
of that model. You can access this statistic page by following “Model” icon
from Statistics Menu.
Below
is a sample graph of model. The graph will be laid out vertically on your
screen. On the left of the graph is the name of the model while the figure on
the right shows number of machines of that model.
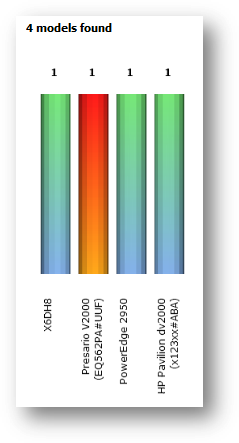
You
may click on any bar on the graph to see the list of machines of the model. Bar
in orange-red indicates the currently selected model.
This
statistic gives you an overall view of the range of hard disk (HDD) storage
sizes being detected on all machines in the system. It gives you a graph view
of each HDD and the number of machines having hard disk of such size.
The
size is a combination size of all hard disk found in every machine. If a
machine has two 100GB of hard disks, the total storage size will be 200GB.
Removable drive and network drives will also be calculated as well.
You
can access this statistic page by following “Hard Disk Storage” icon from
Statistics Menu. Below is a sample graph of HDD storage. On the left of the
graph is the fixed range of the HDD storage size while the figure on the right
shows number of machines with total hard disk storage size of that size.
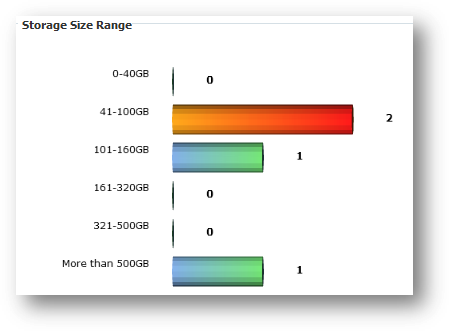
You
may click on any bar on the graph to see the list of machine. Bar in orange-red
indicates the currently selected range.
This
statistic gives you an overall view of the every system manufacturer being
detected by SAMLite. It gives you a graph view of each manufacturer and the
number of machines of that manufacturer. You can access this statistic page by
following “Manufacturer” icon from Statistics Menu.
Below
is a sample graph of manufacturer. On the left of the graph is the name of the
manufacturer while the figure on the right shows number of machines of that
manufacturer.
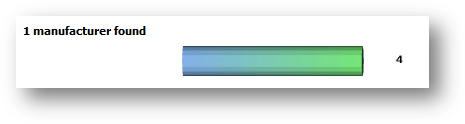
You
may click on any bar on the graph to see the list of machines of the
manufacturer. Bar in orange-red indicate the currently selected manufacturer.
This
statistic gives you an overall view of the every domain being detected by SAMLite.
It gives you a graph view of each domain and the number of machines under that
domain. You can access this statistic page by following “Domain” icon from
Statistics Menu.
Below
is a sample graph of domain. On the left of the graph is the name of the domain
while the figure on the right shows number of machines under that domain.
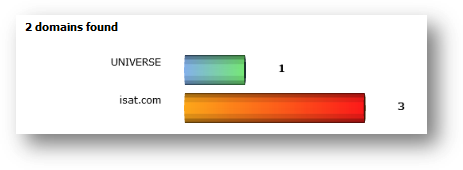
You
may click on any bar on the graph to see the list of machines of the domain.
Bar in orange-red indicates the currently selected domain.
This
section contains miscellaneous query wizards.
You
can use this wizard to find specific hardware information prior to perform
system upgrade. This wizard allows you to find machines that matches hard disk
and memory size specified by you so that you can evaluate whether a machine is
suitable to be upgraded. For example, to find out machines with Microsoft XP
that is capable to be upgraded to Windows Vista, the machine must have at least
10GB of hard disk space and 1GB of RAM. Using this wizard, the system can
easily list down the machines that are eligible for this upgrade project based
on the current hardware information in your inventory.
Go
to upgrade advisor from “Upgrade Advisor” from Query Wizard menu in Inventory
Reports page.
To
start a new query, follow the steps below:
1. Type in the minimum RAM size and minimum free hard disk size at its
respective entry box.
2. Select operating system of the machine you want to upgrade. Select
all operating system if you want to include all.
3. This is an optional step: Select the pre-requisite software that
must be installed. SAMLite
will look for machines that
currently have the selected software.
4. This is an optional step: Select the location of the machines.
After
specifying all these search criteria, click on “Search” button.
The
search result page will show you simple statistics of number of machines
matched the search criteria. Statistics shows:
·
Number of machines matches all the search
requirements
·
Number of machines that fails the search
Click
on the figure (hyperlink) will show you the list of machines for each
statistics.
You
can save your search criteria for re-use especially when your inventory is
updated with more new machines and updated software records. Each login user
will maintain its own saved query for own usage only. Therefore, when you login
to the system, you will only see the queries that you have saved previously,
and not from other users.
To
save your query, you have to key in your pre-requisites and search criteria at
the upgrade wizard page then click “Save” or “Save As” button. You will then be
prompted to save the query with a name of your choice.
To
load the saved query, go to Query wizard menu (Inventory > Query Wizards).
Select any one query from “Saved Upgrade Advisor”. You can then run the query
or edit the pre-requisites and search criteria before searching.
To
delete your query, click “Manage this list” from the “Saved Upgrade Advisor”
section. Click  to
delete the query. You may also hide any saved query by clicking
to
delete the query. You may also hide any saved query by clicking  of the selected query. The
query will not be shown at your list. This can be useful if you only want to
see only most frequently used query and hide the rest. To unhide, click on
of the selected query. The
query will not be shown at your list. This can be useful if you only want to
see only most frequently used query and hide the rest. To unhide, click on  of the selected
query. Click the “Back” button to go back to your query wizard menu.
of the selected
query. Click the “Back” button to go back to your query wizard menu.
This
wizard helps you to find machines that have installed only one instance
of the type of software that has a similar name. This is especially useful when
you want to standardize your machines to have the same set of software in your
organization.
For
example, every machine is your organization should have BOTH Microsoft Office
2007 Enterprise AND Adobe Acrobat 6.0 installed. This is one of your standard
operating environment (SOE) requirements to standardize each desktop to have
same amount of software and the required version. You can use this wizard to
find which machine that only has either Office 2007 or Acrobat 6.0 but not both
of them. Below shows more usage example of the wizard:
·
All desktops/laptops should have
o
Microsoft Office 2007
Enterprise and Acrobat.com
·
All desktops/laptops from Sales department
should have
o
Microsoft Project, Word, Excel, PowerPoint,
OneNote and Acrobat Reader 5.0
Go
to “Find single software installation copy” under “Upgrade Advisor” from Query
Wizard menu in Inventory Reports page.
To
start a new query, type in a software name or a part of the software name into
“Find keywords” text box. For example, considering we are taking from the
example of an organization wanted to find machine that doesn’t have BOTH
Microsoft Office 2007 Enterprise and Adobe Acrobat 6.0, you type in “Office
2007 Enterprise, Acrobat” into the search box. The wizard will filter your
software list to only contain software title that matches these two names.
Optionally,
you can key in the keyword you want to exclude in the search to narrow down the
software list. For example, you want to find all software that has the name
“Acrobat“, but you surely do not want “Acrobatic Games” to appear in the
list. So, you can filter out other name by typing “Games” under Exclude
keywords text box. Click “Find Now” button to begin the search.
From
the returned software list, select Microsoft Office 2007 Enterprise and Acrobat.com.
Then click “Find Machines” button to search for machines. The wizard will list
out machines that have only either one of the search software. The result table
will be shown at the bottom of the page with the machine name and the selected
software.
Figure
below shows a sample of the search result.
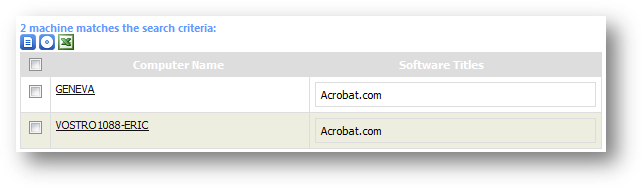
From
here, I discovered that “GENEVA” (my machine name) has only installed Acrobat.com.
With this information, I can install the missing software which is Microsoft
Office 2007 Enterprise to this machine.
After you perform search using this wizard, you can save the
search keywords so that you re-use it again in future. Each login user will
maintain its own saved query for own usage only. Therefore, when you login to
the system, you will only see the queries that you have saved previously, and
not from other users.
To save your query, you have to key in your keywords then
click “Save” or “Save As” button. You will then be prompted to save the query
with a name of your choice.
To load the saved query, go to Query wizard menu (Inventory
> Query Wizards). Select any query from “Saved Software Search” section. You
can then run the query or edit keywords before searching.
To delete your query, click “Manage this list” from the
“Saved Software Search” section. Click to delete the query. You may also hide
any saved query by clicking of the selected query. The query will
not be shown at your list. This can be useful if you only want to see only most
frequently used query and hide the rest. To unhide, click on of the selected query. Click
the “Back” button to go back to your query wizard menu.
This wizard helps you to find machines that have installed more
than one instance of the type of software that has a similar name. This is
especially useful when you have multiple copies of software instances, for
example:
·
Microsoft Office
2003 and Microsoft Office XP
·
SQL Server 2000
with default instance name and SQL Server 2000 (Instance Name)
with another instance name.
You can use this wizard to find out how many software
licenses you need to purchase if there are more than one instance of the
specified software being installed on a machine.
Go to “Find multiple software installation copy” under
“Upgrade Advisor” from Query Wizard menu in Inventory Reports page.
To start a new query, type in a software name or a part of
the software name into “Find keywords” text box. For example, type “Office” or
“Microsoft Office” to filter the software list to only display software title
that contains these keywords. Optionally, you can key in the keyword you want
to exclude in the search to narrow down the software list.
For example, you want to find all software that has the name
“Microsoft Office“, but do not want “Microsoft Office Web Component” to appear
in the list. So, you can type in “Microsoft Office” under Find Keywords text
box and type “Web Component” under Exclude keywords text box. Click “Find Now”
button to begin the search.
From the returned software list, select the software title
you want to find in all machine. You may select multiple software titles from
the list. Then click “Find Machines” button to search for machines. The result
table will be shown at the bottom of the page. The table will show the machine
name and the selected software.
For example, I want to find machines that have multiple
copies of Microsoft Office product. So, I typed “Microsoft Office” under “Find
keywords” text box. Then from the narrowed down software list, I select only
Microsoft Office Enterprise 2007 and Microsoft Office Communicator 2007 R2.
Figure below shows a sample of the search result.

From here, I know that “VOSTRO 1088-ERIC” (my machine name)
have installed both Microsoft Office product.
After you perform search using this wizard, you can save the
search keywords so that you re-use it again in future. Each login user will
maintain its own saved query for own usage only. Therefore, when you login to
the system, you will only see the queries that you have saved previously, and
not from other users.
To save your query, you have to key in your keywords then
click “Save” or “Save As” button. You will then be prompted to save the query
with a name of your choice.
To load the saved query, go to Query wizard menu (Inventory
> Query Wizards). Select any query from “Saved Software Search” section. You
can then run the query or edit keywords before searching.
To delete your query, click “Manage this list” from the
“Saved Software Search” section. Click to delete the query. You may also hide
any saved query by clicking of the selected query. The query will
not be shown at your list. This can be useful if you only want to see only most
frequently used query and hide the rest. To unhide, click on of the selected query. Click
the “Back” button to go back to your query wizard menu.
This wizard helps you to find duplicated machines in SAMLite.
This is catered especially for users who have migrated from previous version of
SAMLite (e.g. v4 or v4.5) where duplication of machine happens when the machine
hostname name or domain is changed. In the current version, duplication will
not happen due to hostname or domain name change as SAMLite now identify
machine by its MAC address and checks whether the MAC address exists for this
machine if it has multiple network adapters.
SAMLite searches for duplicated machine by their MAC
address. In the wizard, we will show the list of machines for every MAC
address. Figure below shows an example of the wizard.
Upon finding out these duplicated machines, you may then
delete the unwanted machine record by selecting the check box of the machine
and click the “Delete machine” button.
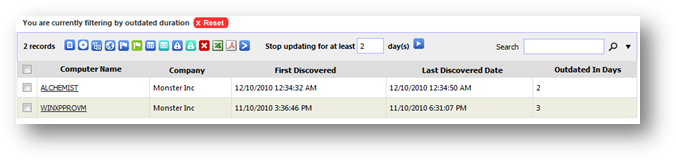
This wizard helps you to find machine that have stopped
updating for x number of days. To find machine that have not been updated for a
period of time, key in the duration (in days) under 'Stop updating for' box and
click the  button.
If last discovered date is not shown at your page, select 'Last Discovered
Date' from more columns option.
button.
If last discovered date is not shown at your page, select 'Last Discovered
Date' from more columns option.
The result will show you the list of machines that were not
updated for more than x number of days as specified. Figure below shows an
example of finding machine that were outdated for at least 1200 days.
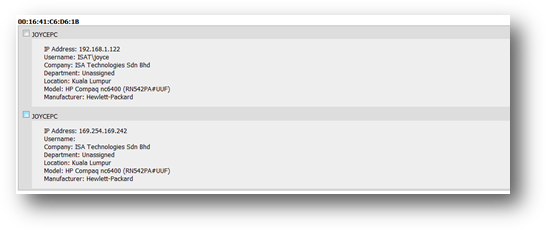
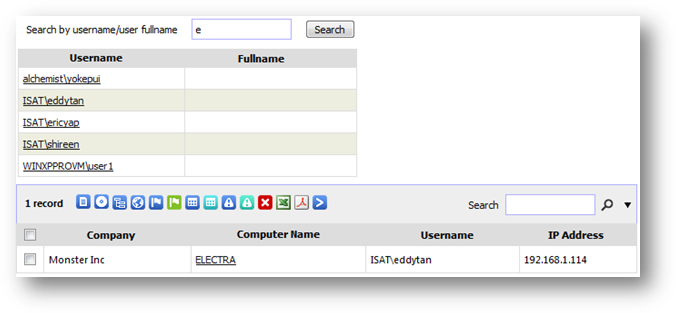
This wizard helps you to find login history of a particular
user. You can use this wizard to find the list of machines that a particular
user has login before.
Specify the username or the user’s full name in the search
box. Click “Search” button to start. Figure below shows an example of searching
all users that have the letter “b” in their username or full name. Under table
“Matching username”, click on any user to see the logged on machine.
Please refer to the separate License Management
manual.
Please refer to the separate SAMLite Software Metering
manual.
SAMLite supports manual and bulk entry of inventory besides
those that are collected automatically by the collection method. You can create
your own asset category called Configuration Item and create or import assets
of that category.
Configuration item is a type of asset that you would like SAMLite
to manage. One configuration item (CI) may be different from another CI due to
different set of attributes a CI might have. For instance, you can create CI
called “Print Server” and create another CI called “Router”. Print Server will
have IP address and DPI attributes, while router have IP address and number of
ports as its attributes. Both CI is different because the set of attributes
between these two CI are different.
You need to create a new CI before you can add asset into
the system. To add new CI, follow the steps below:
1. Go to “Other Assets” from the top menu. Click on “Create New CI”
link.
2.
Give a name to your CI and key in an optional
description. Click the next button.
3.
Then you will be re-directed to add new
attributes to your new CI. Add an attributes for this CI by keying in a name in
the attribute name field. Then click the Add button.
4.
You may continue to add all the attributes in
this page.
5. When you have finished adding all attributes, click on the “Other
Assets” the top navigation menu to see the newly created CI.

To edit CI details, follow the steps below:
1. Go to “Other Assets” from the top menu.
2.
Click into the CI that you wish to edit.
3.
Click Edit Details.
4.
Click Edit the button and start to make changes
to your attribute’s value.
5.
Click save button to save your changes.
6.
You may also create an association with another
CI. Click Create New Association button.
7. Select a CI from the drop down list and click Add button. Repeat to
add more CI as needed.
An Asset is an item of a particular configuration item (CI).
They represent the real asset in your organization.
To add new asset, follow the steps below:
1. Go to the CI page by clicking the CI name from the list of CI you
have created in the main page.
2.
Click New Asset, and key in your asset name.
Click next to continue.
3.
You will be re-directed to the detail page.
4.
You can add information to your asset by keying
in values to your attributes.
5.
Click Save button to save your changes.
6.
You may also assign your asset to department and
location.
7. Click at the CI name at the navigation menu (CI > your CI name)
to return to your CI page.
To edit asset details, follow the steps below:
1. Go to “Other Assets” from the top menu.
2.
Click into the CI that you wish to edit.
3.
Click into the asset that you wish to edit.
4.
Click Edit the button and start to make changes
to your attribute’s value.
5.
Click save button to save your changes.
6.
You may also create an association with another
asset from associated CI that you have established.
7.
You can see the list of asset you can add under
Associated Assets.
8.
Select one or more asset from other CI and click
Add Asset button.
9. Repeat to link to more asset as needed.
SAMLite enables you to establish an association between two
configuration items to reflect the relationship of your assets in the real
world environment. One CI can be associated with one or more than one CIs.
Associating assets in SAMLite gives you aggregation information of how many
assets are linked to your asset and details of the associated assets in an easy
to view format.
To associate an asset to another, you need to establish the
association between the two configuration items first. Then you can proceed to
associate assets of these two CIs.
To establish association between two configuration items,
follow the steps below:
1. Go to “Other Assets” from the top menu.
2.
Click into the CI that you wish to edit.
3.
Click Edit Details.
4.
Click Create New Association button.
5. Select a CI from the drop down list and click Add button. Repeat to
add more CI as needed.
To associate assets, follow the steps below:
1. Go to “Other Assets” from the top menu.
2.
Click into the CI that you wish to edit.
3.
Click into the asset that you wish to edit.
4.
You can see the list of asset you can add under
Associated Assets.
5.
Select one or more asset from other CI and click
Add Asset button.
6. Repeat to link to more asset as needed.
There are two types of attributes:
1. General attributes – used in configuration item
2. Asset Attributes – used in asset
General Attributes
General attribute is an attribute at the root level. It is
the meta data of all configuration items. For instance, you can create a
general attribute called “Own By”. This attribute will be used to track who
owns a particular CI. You can then assign “Jeff” as the owner of Print Server,
while “Jane” as the owner of Router.
To create a general attribute, follow the steps below:
1. Go to Other Asset main page from top navigation menu.
2.
Click Edit General Attribute.
3.
You will see your existing general attributes
(if any).
4.
Key in a name for your attribute and click Add.
5. The newly created attribute will be added into the list.
Asset Attributes
Asset attribute is an attribute at the configuration item
level. Attribute that is created in a configuration item will be unique to that
CI and cannot be shared with other CI.
To create an asset attribute, follow the steps below:
1. Go to Other Asset main page from top navigation menu.
2.
Click into a CI.
3.
Click Edit Attribute.
4.
Key in a name for your attribute and click Add.
5. The newly created attribute will be added into the list.
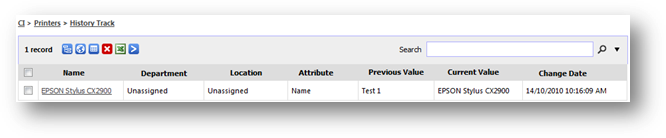
The system maintains a history of what has been changed for
each asset in the database. You can view all the changes that were made since
the asset is added into the system.
To view change by CI, follow the steps below:
1. Go to Other Asset main page from top navigation menu.
2.
Click into a CI.
3.
Click History Track.
4. You may then export the list into Microsoft Office Excel, or perform
filter on your list.
For the Asset Expiry features to work you may need to change
settings for the Asset’s Notification Config
Notification Config
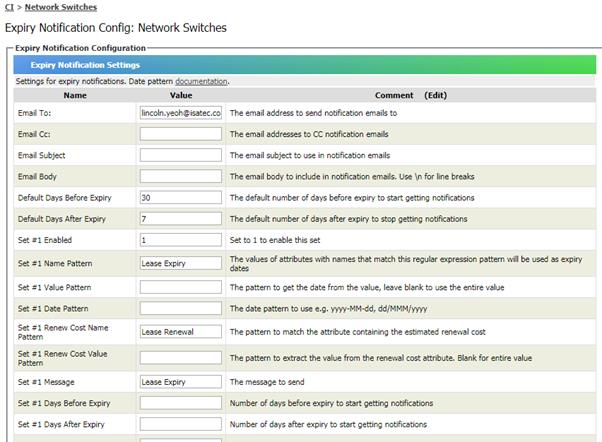
Each asset has its own Expiry Notification Configuration
page.
A Pattern Set is used by the system to figure out which
attributes of an asset contain expiry dates and which attributes contain the
renewal cost.
You can use up to three Pattern Sets which are numbered #1
to #3. If you want to use Set #1 you need to change the value for “Set #1
Enabled” to 1. Similar for the other sets you want to enable.
The patterns are “Regular Expressions”. Specifying a pattern
of Lease Expiry by itself will match anything containing Lease Expiry.
Specifying a pattern of Expiry Date$ will match anything ending with
Expiry Date. The $ matches the end. The patterns are case insensitive, so Lease
Expiry will match lease expiry and Lease expiry and LEASE EXPIRY.
Notification Schedule
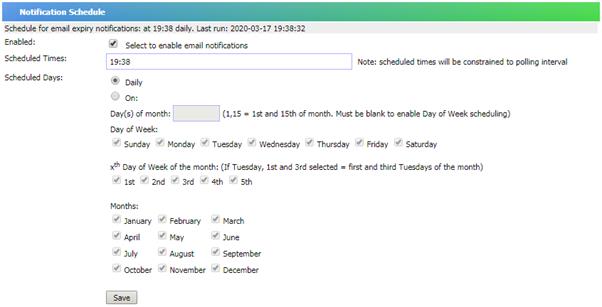
Configure the Email Notification Schedule here.
For email notifications to work, the Schedule must be valid
and enabled, and also the Email To: must be valid. Please also ensure that the
correct SMTP server settings are configured at: Administration, System
Settings, Configure Email Notification.
Click Save to save all settings.
Asset Expiry Reporting
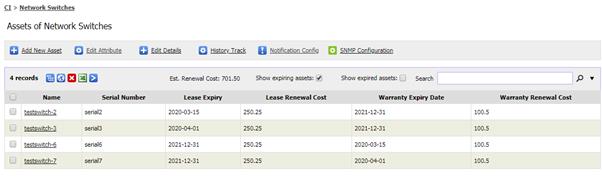
After setting things up in the Notification Config, you can
then use the asset expiry features in the Asset report. Select “Show expiring
assets” to list assets that are expiring soon or have expired recently
(controlled by the Days Before Expiry and Days After Expiry settings). Select
“Show expired assets” to list assets that have expired. Select both to list
assets that are expiring soon or have expired.
The estimated renewal cost text will appear if the assets
have renewal cost attributes and the patterns are set up appropriately and
there are expired/expiring machines.
Scan Agents must be installed in order for SNMP
queries to be performed. Download Scan Agents via Administration, Scan
Agents, Download Scan Agents.
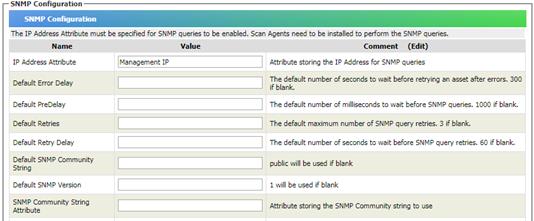
To enable SNMP querying of assets by the Scan Agents the IP
Address Attribute has to be configured and specified. For example if the
attribute that contains the IP address for all Printers is called “Management
IP” then enter Management IP as the value for IP Address Attribute.
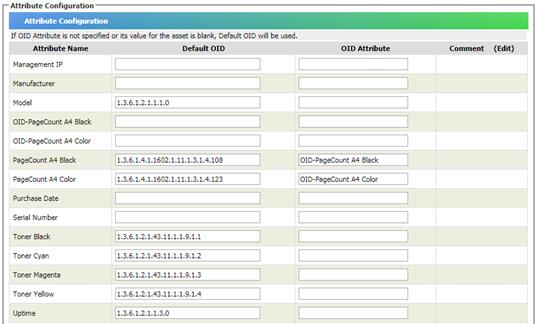
Next specify the Default OIDs for each Attribute to
be updated via SNMP.
You can also specify an OID Attribute which stores
the alternative OID to use if a different OID is to be used for that asset.
This can be necessary if the asset is a different model or type.
Currently SNMP queries are only done once a day for each
query-able attribute.
To bulk import assets for a particular
Configuration Item you can use the Import CI Wizard to upload a CSV file where
the first line contains the column/attribute names and all the lines
after are the data for each item.
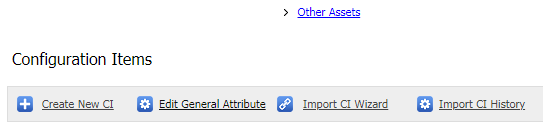
Go to Other Assets, Import CI Wizard.
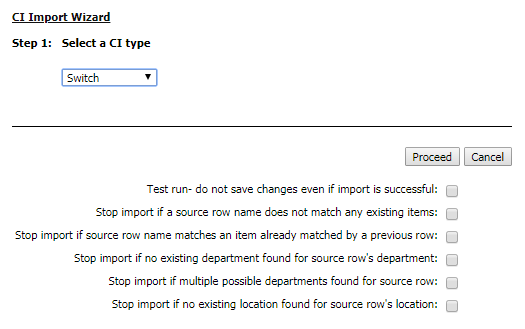
Then select the CI Type and press Proceed.
Choose a CSV file (first line = headers )and click upload

Then click on Proceed

To map unmapped columns right click on a source column on
the left and select the destination column to be mapped to:
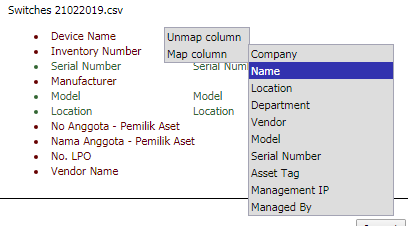
e.g. in the above screen shot Device Name was being mapped
to Name.
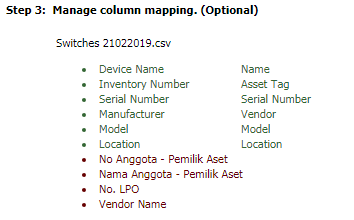
Once done double click on the row with the “Name” column to
mark it as the Primary Key
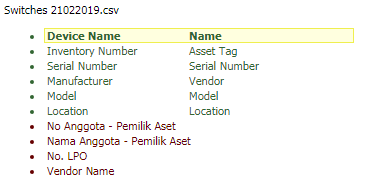
The Name columns will then be in bold.
When done click on Import
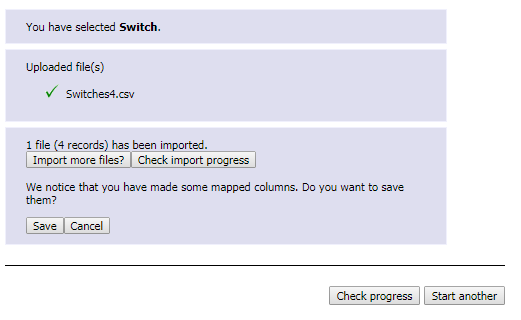
Then you can check the progress in the CI Import History
report. The import process can take a while if there are very many items.

This
section allows the following tasks:
·
Managing users and roles
·
Managing companies
·
Managing departments
·
Managing locations
·
Managing software views
·
Managing custom field
·
Managing Dormant User Account
·
Configuring System Settings
·
Managing Software Rules and Categories
·
Managing the Warranty Updater
·
Managing Scan Agents
Some
tasks may be disabled/hidden from users without the required roles.
To
see and manage SAMLite report, a valid user account needs to be created to
login to the system. The user account will identify who is accessing the report
and what the user can do to the inventory information. User role will determine
what the user can do on the information. By default, a user will be given the
privilege to view the report without the ability to make any changes to the
information. To manipulate information like deleting machines and creating new
user, the user role need to be elevated to the appropriate role that has the
permission to perform these activities.
Supported
user and role management are as follow:
·
Create user account
·
Modify user account
·
Add and remove user roles
To
create new user account, you must be a “User Account Manager”. A system
administrator is also a user account manager by default.
Go
to the administration page. Under “User Account and Roles” section, click
“Create User” link. Here are the steps to create new user account:
1.
Type in a name under the username text box and
click “Check User Name” button. The system will check for any existing user
name before you can use the name.
2.
If the username has been used, you have to
provide another name.
3.
Once your username is available, type in the
password and repeat that password.
4.
*Optional. You may enter other information like
email, phone no, fax and address.
5.
*Optional. You may select “Lock out this user”
check box to disable this user from logging into to the system until she is
unlocked by any user account manager.
6.
Click “Create User” button to create this new
user account. Or you may check “Skip assigning role after creating this user”
button to continue to create new user account.
7.
After creating the account, you have to assign a
role to the user. By default, the user will be given the restricted privilege
role group called “Reporting Users”. You may give the user a higher role group
like “System Administrator” or “Inventory Administrator” or customize her role
by adding specific roles to her account.
8.
To create another user account, click “Skip
assigning role and create another user” button. This will lead you back to the
create user page.
After
creating the new user account, the user can start to login to the system in
immediate effect.
To
modify user account, you must be a “User Account Manager”. A system
administrator is also a user account manager by default.
Go
to the administration page. Under “User Account and Roles” section, click
“Edit/Delete User” link. Here are the activities you can perform under this
page:
·
Rename username
·
Lock out user account
·
Reset password
·
Delete user
Rename username
Here
are the steps to rename a user’s username:
1.
Click on a username of the left pane. The
selected username will be shown at the right pane.
2.
Click “Rename” link to activate the username.
3.
Rename the username and click “Save” button.
4.
The username will be renamed in immediate
effect.
Lock out user
account
Here
are the steps to lock out a user account:
1.
Click on a username of the left pane. The selected
username will be shown at the right pane.
2.
Check “Is locked out” check box to lock out this
user.
3.
Click “Save” button
4.
The user account will be locked out in immediate
effect.
Reset password
Here
are the steps to reset a user password:
1.
Click on a username of the left pane. The
selected username will be shown at the right pane.
2.
Click “Reset Password” button to prompt you the
form to change password
3.
Type in the new password and repeat the
password.
4.
Click “Save Password” button.
5.
The user’s password is changed in immediate
effect.
Delete user
Here
are the steps to delete a user account:
1.
Click on a username of the left pane. The
selected username will be shown at the right pane.
2.
Click “Delete this user” button. Click “Yes” to
confirm your deletion or “No” to cancel this operation.
3.
The user account is deleted in immediate effect.
Important
You
cannot rename, lock out and delete the “administrator” account as this is the
default user in SAMLite. You can only reset the administrator account password.
It is strongly encouraged to change the administrator password once you have
created more than one user in the system to avoid anonymous user to guess its
default password. Default password for “administrator” account is “password”.
To modify
user account, you must be a “User Account Manager” and “User Role Manager”. A
system administrator is also a user account manager and user role manager by
default.
Go
to the administration page. Under “User Account and Roles” section, click
“Add/Remove User Roles” link. Here are the steps to add and remove user roles:
1.
Click on a username of the left pane. The
selected user’s role list will be shown at the right pane.
2.
You may do either one of these steps to assign
roles to a user:
a. You can select any role group for this user. This is the easiest
way to assign the list of roles to a user. For example, you can click “Be a
system administrator” link to assign this user with System administrator role.
System administrator role has the full privilege in the system. You may see the
role description for more details on each role group rights.
b. Alternatively, you can select “Be a custom role users” to add only
the necessary roles to a user. For example, if you want the user to only the
privilege to manipulate location but do not want her to have the rights to
manipulate company and department, you can assign only “Location Moderator”
role to her, while remove “Company Moderator” and “Department Moderator” from
her role list.
3.
The new role will take effect immediately when
you select the specific role or role group to the user.

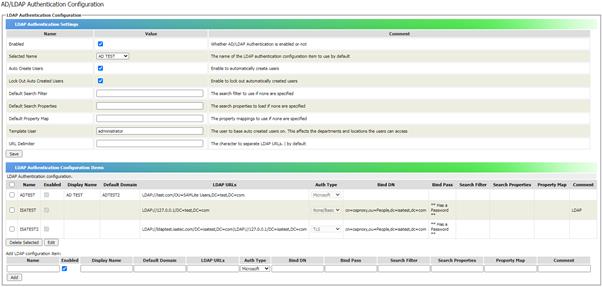
LDAP Authentication Settings
Select “Enable” if you want to enable AD/LDAP authentication.
Note: if no LDAP Configurations are enabled the login screen will revert to using
the normal Form Authentication.
Enable Auto Create Users if you want to automatically
create SAMLite accounts for AD/LDAP users upon successful login. If you enable
this, all users that can login using the AD/LDAP will be able to login and use
the SAMLite system. They will be assigned the reporting user role and the Template
User’s view permissions. If Auto Create Users is not enabled, users
will see an “Unauthorized user” message even if they enter the correct
credentials. Their accounts won’t be created and you will have to create the
accounts for them before they can login.
Enable Lock Out Auto Created Users if you want auto-created
users be locked out when their accounts are created. Their accounts will be
created if Auto Create Users is enabled but they can’t log in. This allows you
to set up the roles and permissions for the users before unlocking their
account and letting them use the account.
If you are creating users manually, the SAMLite username format
must be ConfigName\username where ConfigName is the name
of the LDAP Configuration Item, and username is the user name the users
will use for logging in. For example create a SAMLite user called: ADTEST\tempuser
for a user called tempuser that logs in using the LDAP config ADTEST.
Specify the Template User to use as a base for
autocreated users. The Template User’s department and location access
settings will be copied for auto-created users.
LDAP Authentication Configuration Items
For Active Directory authentication you normally only need
to specify the Name, Default Domain, LDAP URLs and Auth
Type = Microsoft. An LDAP URL is in the format: LDAP://<The Active
Directory Domain or Server Address>/<Path>. If your
Active Directory domain is test.com the URL could be:
LDAP://test.com/DC=test,DC=com.
If all the users that are allowed to use SAMLite are in an OU called SAMLite
Users the URL could be: LDAP://test.com/OU=SAMLite Users,DC=test,DC=com
If you need to match only users in a security group you will need to specify a
custom search filter. For example: (&(objectClass=person)(sAMAccountName=@username)(memberof=CN=SAMLite
Users,DC=test,DC=com))
When configuring for LDAP Authentication you usually only need
to specify the Name, LDAP URLs, Auth Type, Bind DN and
Bind Pass. Auth Type = Anon is no authentication at all. Use Auth Type
None/Basic for simple Bind DN authentication. Use Auth Type TLS if TLS is being
used (keep the URL as LDAP:// and not LDAPS://). Note that the certificate has
to be recognized by the SAMLite server. If you are using a custom CA you will
need to add the CA’s certificate to the SAMLite server’s Trusted Root
Certificate Authorities. STARTTLS is not supported.
More than one LDAP URL can be specified, separate them with “|”.
But they must use the same Auth Type, Bind DN and Bind Pass. If each URL is
inaccessible the next URL will be tried.
AD/LDAP Defaults
The defaults for the following parameters if left blank:
|
Search Filter
|
(|(uid=@username)(SAMAccountName=@username))
|
|
Search Properties
|
samaccountname,objectsid,mail,cn,displayname,dn,distinguishedname,
facsimileTelephoneNumber,mobile,telephoneNumber,streetAddress,uid,gecos
|
|
Property Map
|
samaccountname=UserName,objectsid=UserSID,mail=Email,displayname=FullName,
distinguishedname=Description,facsimileTelephoneNumber=FaxNo,mobile=MobileNo,
telephoneNumber=PhoneNo,streetAddress=Location,dn=DN,uid=UserName, cn=FullName,gecos=GECOS
|
For the Search Filter the string “@username” is replaced by
the user name specified when logging in. The default search filter might work
for most AD and LDAP configurations.
The Search Properties are the LDAP properties/attributes fetched
when searching for the username that’s being used to login.
The Property Map specifies how those fetched LDAP properties/attributes
are mapped to SAMLite parameters. e.g. samaccountname will be converted to
UserName. Mobile will be converted to MobileNo. Some of these parameters will
be used when auto creating the user. The format is attribute1=ParameterName,attribute2=ParameterName2,attribute3=ParameterName2.
More than one attribute can map to the same parameter. But a single attribute
cannot be mapped to more than one parameter.
The GECOS parameter is a special case that has multiple sub
fields delimited by commas. These subfields will be mapped as follows:
FullName, Location, PhoneNo, FaxNo.
You
can create a company structure similar to how your organization’s company
hierarchy is currently constructed. For example, your organization may have a
child company that you want SAMLite to manage its hardware and software
inventory. Create a company as a child company under your organization name.
Thus, SAMLite will be able to store and let you to administer both your
organization and the child company’s inventory information in a single
reporting console. Nevertheless, SAMLite does not limit you to only create
company under a parent company. You may have a sister company that sits side by
side to your organization. Create another company in SAMLite but does not
arrange it under your organization. Thus, SAMLite will be managing two parent
companies.
Supported
company management options are as follows:
·
Create new company
·
Modify company details
·
Set default company
To
create new company, you must be a “Company Moderator”. A system administrator
or inventory administrator is also a company moderator by default.
Go
to the administration page. Under “Company” section, click “Create Company”
link. Here are the steps to create new company:
1.
Go to Step 1: Give a name for your new company,
type in a company name.
2.
Optional*. From Step 3: Select a parent company
(optional); select a company to be the parent company for you new company. If
you do not select any company, your new company will be created as a root level
company (company that has no parent).
3.
Click “Check Company Name”. The system will
check whether your company name is available for usage. The availability is
determined whether your new company name has already exists under the selected
parent company/root level.
4.
Click “Create Company” button.
5.
The new company will be created in immediate
effect.
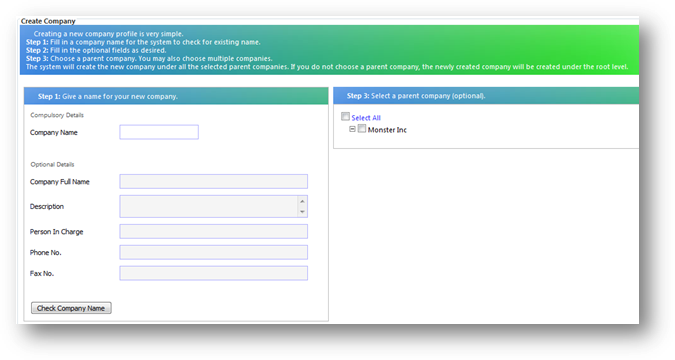
To
modify company details, you must be a “Company Moderator”. A system
administrator or inventory administrator is also a company moderator by
default.
Go
to the administration page. Under “Company” section, click “Edit/Delete
Company” link. Here are the steps to modify company details:
1.
Select a company from the left pane. The
selected company details will be shown at the right pane.
2.
You may change any details in the form and click
“Save” button to commit the changes.
3.
To delete the company, click “Delete This
Company” button. Click “OK” to proceed with the deletion, while clicking
“Cancel” will cancel this operation.
4.
Once a company is deleted, all the underlying
departments will be deleted as well.
5.
The company will be deleted in immediate effect.
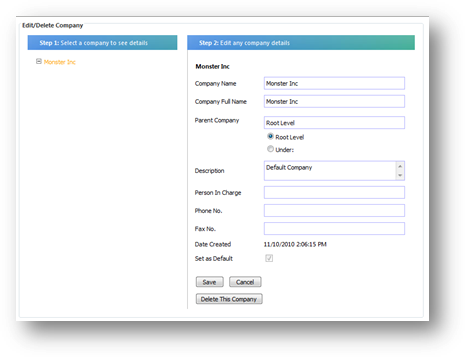
To
set a company as the default company, you must be a “Company Moderator”. A
system administrator or inventory administrator is also a company moderator by
default. Assigning a company as the default company in SAMLite simplified other
manual administration work that involve selecting company in its operation, as
if you do not select any company, the default company understood by SAMLite is
the default company chosen by you here. By default, the default company is the
company called “Default”. You may assign another company as the default
company, as this is the purpose of this section.
Go
to the administration page. Under “Company” section, click “Set Default
Company” link. Here are the steps to assign a default company:
1.
The page will first show you current default
company.
2.
To select another company as the default
company, click on the company from “Choose a new default company” list, and
click “Set As Default Company” button.
3.
The selected company will be assigned as the
default company in SAMLite in immediate effect.
You
can create locations in SAMLite that reflect the how your organization’s
branches/remote offices are currently located. Creating location and assigning
machines to location gives you a better organization and manageability
perspective to oversee your current inventory base.
Supported
location management are as follows:
·
Create new location
·
Modify location details
·
Delete location
·
Assign machine to location
·
Map IP address to location
·
Authorize user to location
·
Bulk Import Locations
·
Location Notification Configuration
To
create new location, you must be a “Location Moderator”. A system administrator
or inventory administrator is also a location moderator by default.
Go
to the administration page. Under “Location” section, click “Create Location”
link. Here are the steps to create new location:
1.
Under “Create Location” section, key in the new
location name and click “Check Name” button to check for the name availability.
2.
Optional*. If the name is available for use, you
may key in the rest of the location details.
3.
Click “Create Location” button.
4.
The new location will be shown on the location
list “Existing Location” shown at the left pane of the page.
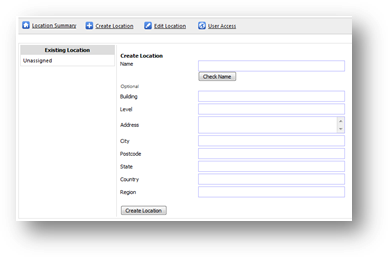
To
edit location details, you must be a “Location Moderator”. A system
administrator or inventory administrator is also a location moderator by
default.
Go
to the administration page. Under “Location” section, click “Edit Location”
link. Here are the steps to edit location details:
1.
Select a location from the list of existing
location at the left pane. The details will be shown at the right pane.
2.
You may then make any changes to the details and
click “Save” button to save the changes.
3.
The changes will be in effect immediately.
To
delete location, you must be a “Location Moderator”. A system administrator or
inventory administrator is also a location moderator by default.
Go
to the administration page. Under “Location” section, click “Location Summary”
link. Here are the steps to delete existing location:
1.
Check one or more check boxes of the locations
you wish to delete.
2.
Click “Delete
selected location”. Click OK button to proceed with the deletion, while
clicking Cancel button will cancel the deletion.
3.
If the location contains any machines, these
machines will be moved to “Unassigned” location. However, you cannot delete the
“Unassigned” location as that is the built-in/default location in the system.
To
assign machine to location, you must be a “Location Moderator”. A system
administrator or inventory administrator is also a location moderator by
default.
Go
to the administration page. Under “Location” section, click “Assign machine to
location” link. Here are the steps to do that:
1.
Select the machine you want to assign to a location.
There are two ways to select the desired machines. You can use either one of
these options for different situations.
a. Check one or more check boxes of the machines that you wish to
assign to a location. Important! You can only select multiple
machines that are displayed in the list of the same page. You cannot select
machines across pages. For example, you have chosen 3 machines from page 1 of
the machine list, and then you click on page 2 to choose 2 other machines. If
you do so, those machines you have selected in page 1 will not be in the list
of machines you have selected. When you assign these machines to location, only
2 machines from page 2 will be assigned. Thus, you have to select machines from
the same page then assign to a location, then you repeat the same steps on
other pages.
b. Check “Select all machines filtered by selected location(s)”. This
option is the simplified way to select all machines that were previously
assigned to the location(s) that you have selected at department filter. This
option is only suitable to move machines from location to another location AND
you have filtered the machine list by using the location filter (Filter machine
by location). For example, I want to re-assign all machines from location
SINGAPORE to BANGKOK. Instead of selecting each check box of my machines from
Singapore, I can firstly filter my machine list to only from Singapore. Then I
check the “Select all machines filtered by selected location(s)” check box to
tell the system that I want to select all machines from Singapore automatically.
2.
Then I click “Select Location” button at the top left
of the page to display the list of available locations.
3.
Select the target location and click “OK” button to
start to assign machines to the target location.
4.
The selected machines will be assigned to the target location
in immediate effect.
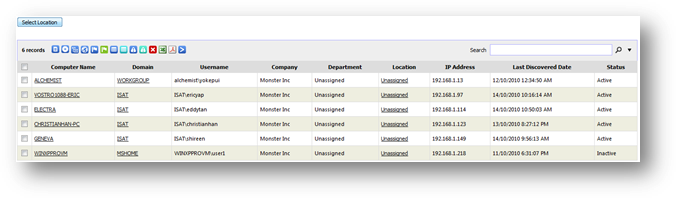
To
do this operation, you must be a “Location Moderator”. A system administrator
or inventory administrator is also a location moderator by default. This
operation is another alternative method to assign machines to a location. This
method leverages on machine’s IP address to determine which location the
machine will be assigned to. The assignment will be performed by Import Service
when the machine is being updated.
To
use this method, the administrator firstly needs to define the range of IP
address to be mapped to a location. Whenever a machine from that range of IP
address is updated either via passive collection, active scan or Microsoft SMS
synchronization, the machine will be assigned to the designated location.
Define IP
Range-location mapping
Go
to the administration page. Under “Location” section, click “Map IP Address to
Location” link. Here are the steps to define your IP address- location mapping:
1.
Click “Add” link at the top of the page.
2.
Under Step 1: Key in an IP range, type in the
range of IP address you want to assign to a particular location.
3.
Under Step 2: Select a location to be mapped to
the IP range, select a location that you want that IP range to be mapped to.
4.
Optional*. You may check “Overwrite assigned
machines” to overwrite machine’s location for subsequent machine update.
Un-checking it will tell the system to not to update the machine’s location if
they have being assigned one.
5.
Click “Add” button at the bottom of the page to
add the mapping into the system.
6.
The Import Service will use your mapping and
update any machines with IP address of that range to the selected location on
your pre-defined schedule.
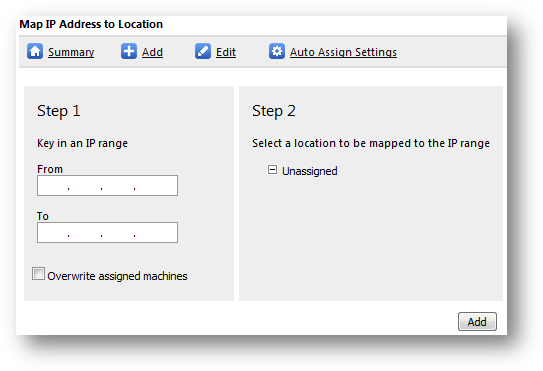
See mapping summary
Go
to the administration page. Under “Location” section, click “Map IP Address to
Location” link. Here are the steps to see your existing mapping summary:
1.
Click “Summary” link at the top of the page.
2.
If you have defined any mapping previously, you
will see all your mapping settings at this page.
3.
Under this page, you can force the mapping to
run manually now by clicking  “Assign location for
this IP mapping” of the specific mapping. Or you can click “Run all IP mapping assignment now” to run all existing mapping.
“Assign location for
this IP mapping” of the specific mapping. Or you can click “Run all IP mapping assignment now” to run all existing mapping.
4.
You will see a status message informing you
total number of machines being updated after running the assignment.
Edit mapping record
Go
to the administration page. Under “Location” section, click “Map IP Address to
Location” link. Here are the steps to edit your existing mapping record:
1.
Click “Edit” link at the top of the page.
2.
You will see the list of IP-location mapping at
the left pane. Click  of any mapping to see
its details at the right pane.
of any mapping to see
its details at the right pane.
3.
You may then make any changes to your selected
mapping and click “Save” button to save your settings.
4.
The changes will take effect immediately.
Setting up mapping
schedule
Go
to the administration page. Under “Location” section, click “Map IP Address to
Location” link. Setting up the schedule enables SAMLite Import Service to run
your mapping automatically on your specified date and time. Thus, you do not
need to manually assign machine to location in a continuous manner. Here are
the steps to set up the mapping schedule:
1.
Click “Auto assign settings” link at the top of
the page.
2.
Check the check box of “Enable auto assign by
schedule”. By default, it is un-checked to disable this functionality.
3.
Key in the number of days you want to run this
auto assignment under the Interval (in days) text box. For example, if you key
in 2 days, the system will auto assign machine to location based on IP address
every 2 days.
4.
Select your desired time of the day to run the
assignment.
5.
Click “Save” button to save the settings.
To
do this operation, you must be a “Location Moderator”. A system administrator
or inventory administrator is also a location moderator by default. The
administrator can determine the location(s) that a particular user can access.
This allows any user the access rights to see and manipulate inventory information
only from the authorized locations.
Go
to the administration page. Under “Location” section, click “Authorize User to
Locations” link. Here are the steps to authorize a user to location(s):
1.
You will see the list of users on the left pane.
Select a user to see the existing location(s) that this user is authorized to
access on the right pane.
2.
You may check and un-check any location you want
this user to access. Un-checking any location will prevent access the user to
access the location, and vice versa.
3.
Click “Save” button to save the settings.
4.
The changes will be in effect immediately.
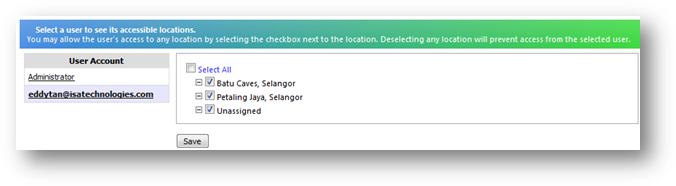
This feature allows you to create Locations and IP to
Location mappings from a tab-delimited text file or CSV file.
The first line of the file should contain the column names,
and the rest of the lines should contain the corresponding data for those
columns.
Example #1:
Location Building State Country
MY-ISA-KL-1 1 First Avenue Selangor Malaysia
AU-ISA-HQ-1 Systems Research Centre Western Australia Australia
AU-ISA-DC-1 ISA Data Centre 1 Western Australia Australia
Example #2 with IP Ranges for IP to Location mapping:
Location IP Range Building
MY-ISA-KL-1 10.10.1 1 First Avenue
MY-ISA-KL-1 172.16 1 First Avenue
AU-ISA-HQ-1 10.11.0.0-10.11.4.255 Systems Research Centre
AU-ISA-DC-1 10.32.0.0/14 ISA Data Centre 1
AU-ISA-DC-1 10.16.0.0/14 ISA Data Centre 1
Multiple IP Ranges can be specified for each location.
However if multiple entries for other details are specified for each location the
later entries will overwrite the earlier ones.
Supported Columns
Location – used to specify the Location name
Address, Building, City, Country, Level, Postcode,
Region, State – for specifying Location details
IP Range – for specifying IP ranges for IP to
Location mappings.
Supported IP Range formats :
|
IP Range format
|
Resulting IP range
|
|
10.
|
10.0.0.0 to 10.255.255.255
|
|
10.23
|
10.23.0.0 to 10.23.255.255
|
|
10.23.44
|
10.23.44.0 to 10.23.44.255
|
|
10.23.0.0/23
|
10.23.0.0 to 10.23.1.255
|
|
10.23.0.1-10.23.5.127
|
10.23.0.1 to 10.23.5.127
|
Overwrite – for specifying whether the IP to
Location mapping should overwrite or not. Supported values are True or False.
An unsupported or blank value is equivalent to the default setting which is controlled
by the “IP range mapping overwrites by default” upload setting.
Creating a CSV file
To create a comma separated values
(CSV) file using Excel:
- Create or open an
Excel spreadsheet with the first row containing the column names and the
data in the other rows:
Example for bulk uploading IP range to Location mappings
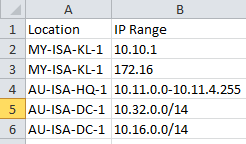
Example for bulk uploading Location details
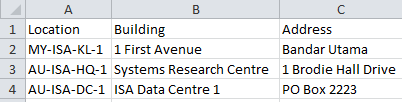
- Choose File->Save As from the menu.
- In
the 'Save as type' dropdown, select 'CSV (Comma delimited)
(*.csv)' and click Save.

Creating a tab-delimited text file
To create a tab-delimited, UTF-8
encoded text file using Excel:
- Create or open an
Excel spreadsheet with the first row containing the column names and the
data in the other rows:
Example for bulk uploading IP range to Location mappings
Example for bulk uploading Location details
- Choose File->Save As from the menu.
- In the 'Save as
type' dropdown, select 'Text (Tab delimited) (*.txt)'
- Click on the 'Tools'
dropdown at the bottom near the save button and select 'Web Options'
- Select the 'Encoding'
tab.
- In the 'Save
this document as:' dropdown, select 'Unicode (UTF-8)'
- Click OK, then specify the file
name and click Save.
- You can now upload
and import the saved text file
In this section you can configure Location Notifications.
These allow periodic emailed reports of machines that have moved beyond their
assigned locations.

Check Days is the number of days that the system will
look in the location history to see if the machine has left a location. The
last known location will always be considered.
Examples: Check Days = 0 means only the last known location
will be considered and the location history will not be used. If Check Days is
set to 30 and a machine has been detected to have left a location within 30
days but has returned it will show up in the report.
Accuracy is in metres. The default value is 500. This
means that geolocation data that has an accuracy uncertainty that’s higher than
500m will be ignored. So if a machine appears to have left a location but the
geolocation accuracy is higher than 500m, this data will be ignored.
For Email Subject and Email Body, any
occurrences of [MachineCount] will be replaced by the number of machines that
are considered to have roamed and left their assigned locations.
Example: specifying an Email Subject of: Roaming
Machines: [MachineCount] will
result in an email subject of: Roaming Machines: 12, if the number of
roaming machines is 12.
You
can create hierarchy of department that reflects how your current organization
structure is laid out in SAMLite. Creating department and assigning machines to
department gives you a better organization and manageability perspective to
oversee your current inventory base.
Supported
department management options are as follows:
·
Create new department
·
Modify department details
·
Change parent department
·
Change department’s company
·
Assign machine to department
·
Auto assign machine to department by Active
Directory user
·
Map IP address to department
·
Authorize user access to certain departments
To
create new department, you must be a “Department Moderator”. A system
administrator or inventory administrator is also a department moderator by
default.
Go
to the administration page. Under “Department” section, click “Create
Department” link. Here are the steps to create new department:
1.
Under step 1 and 2: Give a name for your new
department, key in your new department name.
2.
Optional*. Under step 3: choose a company/
parent department, select a department in which you want your new department to
be under. If you do not specify any department as the parent department, the
new department will be at the root level of the selected company/ default
company.
3.
Click “Check Existence” button to check for
department name availability.
4.
Optional*. If the name is available, you may
fill in the rest of the fields like division, description, head of department,
etc.
5.
Click “Create Department” to create your new
department based on the name you have specified.
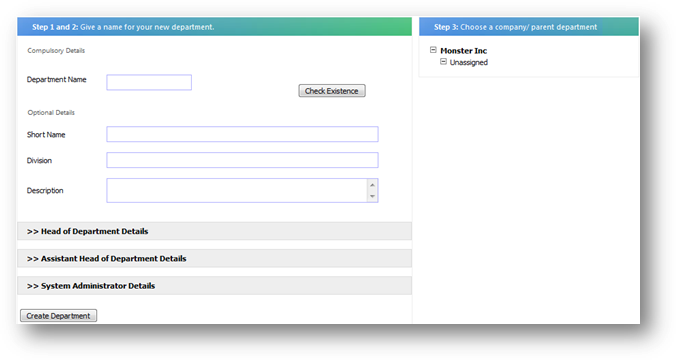
To
edit or delete existing department, you must be a “Department Moderator”. A
system administrator or inventory administrator is also a department moderator
by default.
Go
to the administration page. Under “Department” section, click “Edit/Delete
Department” link.
Edit department
To
edit a department details, click “Edit Department” link at the top of the page.
Here are the steps to modify department details:
1.
Select a department from the left pane. The
information about the selected department will be shown at the right pane. You
cannot modify the default “Unassigned” department that is available in every
company.
2.
You may then make any changes to the department
details.
3.
Click “Save” button to save the changes.
4.
The changes will be reflected to the selected
department in immediate effect.
Delete department
To
delete a department, click “Delete Department” link at the top of the page.
Here are the steps to delete department:
1.
Under Step 1: choose one or more departments to
delete, check the check box of your department or multiple departments.
2.
Deleting a department that has children will
delete all the children as well. Machines that are under these departments will
be re-assigned to the “Unassigned” department of your default company. You may
choose to move to another department by clicking “Change destination
department” link and select the desired department.
3.
Click “Delete selected departments”. The system
will move the machines from the selected departments to your desired department
before deleting these machines.
4.
The deletion of these department(s) will take
effect immediately.
To
change parent department, you must be a “Department Moderator”. A system
administrator or inventory administrator is also a department moderator by
default.
Go
to the administration page. Under “Department” section, click “Change Parent
Department” link. Here are the steps to change parent for a department:
1.
Under Step 1: Select a department to change its
parent, select the department that you wish to change its parent.
2.
Under Step 2: Select a parent department; select
the target parent for the selected department.
3.
Click “Change” button.
4.
The department’s new parent will take effect
immediately.
To a
department’s company, you must be a “Department Moderator”. A system
administrator or inventory administrator is also a department moderator by
default.
Go
to the administration page. Under “Department” section, click “Change Company”
link. Here are the steps to change the company for the department:
1.
Under Step 1: Select one or more departments,
select one or more departments that you wish to change its company.
2.
Under Step 2: Select a destination company;
select the target company for the selected department(s).
3.
Click “Change” button.
4.
The selected department(s) company will take
effect immediately.
To
assign machines to department, you must be a “Department Moderator”. A system
administrator or inventory administrator is also a department moderator by
default. There are 3 methods to assign machines to department. This section
introduces the most straight forward method to do this.
Go
to the administration page. Under “Department” section, click “Assign machine
to department” link. Here are the steps to assign machine to department:
1.
Select the machine you want to assign to a
department. There are two ways to select the desired machines. You can use
either one of these options for different situations.
a. Check one or more check boxes of the machines that you wish to
assign to a department. Important! You can only select multiple
machines that are displayed in the list of the same page. You cannot select
machines across pages. For example, you have chosen 3 machines from page 1 of
the machine list, and then you click on page 2 to choose 2 other machines. If
you do so, those machines you have selected in page 1 will not be in the list
of machines you have selected. When you assign these machines to department,
only 2 machines from page 2 will be assigned. Thus, you have to select machines
from the same page then assign to a department, then you repeat the same steps
on other pages.
b. Check “Select all machines filtered by selected department(s)”. This
option is the simplified way to select all machines that were previously
assigned to the department(s) that you have selected at department filter. This
option is only suitable to move machines from department to another department
AND you have filtered the machine list by using the department filter (Filter
machine by department). For example, I want to re-assign all machines from
department SALES to MARKETING. Instead of selecting each check box of my Sales
machines, I can firstly filter my machine list to only from sales department.
Then I check the “Select all machines filtered by selected department(s)” check
box to tell the system that I want to select all machines from my Sales department
automatically.
2.
Then I click “Assign to…” button at the bottom
left of the page to display the list of available departments.
3.
Select the target department and click “OK”
button to start to assign machines to the target department.
4.
The selected machines will be assigned to the
target department in immediate effect.
To
do this operation, you must be a “Department Moderator”. A system administrator
or inventory administrator is also a department moderator by default. This
operation is an alternative method to assign machines to a department by
leveraging on active directory user. The administrator needs to upload a
specialized mapping file to the system in order for the system to run
the auto assignment.
User-department
mapping file
The
uploaded file contains each Active Directory user’s name and the department of
the user. By using this file, SAMLite takes the mapping of user to department
to map the machine in which the user has used before to the department. To
obtain this mapping file, the administrator needs to manually generate it using
a script (VB Script) provided by default in SAMLite. You can get the script (user.vbs)
from “UserDeptScript” folder under SAMLite installation directory. Here are the
steps to generate the mapping file:
1. Bring the script (user.vbs) to any of your Active Directory
server (AD server) that host the global catalogue.
2. Run the script (by double click the file) at the AD server.
3. The result file will be the mapping file called “users.xml” located
at the root of C: drive. You can rename the file to any name you desired in a
later date.
Running the mapping
file
Go
to the administration page. Under “Department” section, click “Auto Assign
machine to Department by AD user” link. Here are the steps to run auto assign
machine to department:
1.
Under “Upload an AD User-Department file”
section, click the browse button to select the mapping file to be uploaded onto
the system. Click “Upload” to upload the file.
2.
The uploaded file will be shown at the “Uploaded
file(s)” table.
3.
Click “Open and Analyze” of the uploaded file.
4.
An analysis report will be shown at the bottom
the upload file table to show the content of the uploaded file.
5.
Follow section below: Analyzing mapping file
content
Analyzing mapping
file content
The
analysis shows the content of the mapping file. There’s a few important
information from the analysis table:
·
Currently loaded mapping file
·
Number of AD users detected
·
Number of unique department
·
Number of records assignable – how many AD users
from the mapping file that have direct mapping to existing departments in SAMLite.
·
Number of records not-assignable – the opposite
of Number of records assignable
There
will be 2 tables showing on this page. On the left table, shows the list of
departments detected from the mapping file while on the right table shows the
list of users from the mapping file.
On
the department table (left table), the systems tells you what are the
departments found in the mapping file and whether they have being created in SAMLite
or not. You have the option to create them as new department in the system.
Creating these departments will increase number of records assignable higher as
more user-department mapping can be found now. You may also have the option to
change the company for the department that are about to be created by clicking
the icon to select another company. By
default new department will be created under the default company that you have
set.
On
the users table (right table), the system tells you who the users found in the
mapping file and whether their machine can be assigned to department or not. To
increase the chances of user assignable to a department, ensure each user is
assigned a department at the Active Directory. Alternatively, you can modify
the mapping file to assign a department for specific user without making any
changes at the Active Directory level.
You
may also opt to overwrite or not to overwrite machine that previously already
being assigned to a department by checking the “Overwrite assigned records”
check box if you want to run the mapping file multiple times or running an
updated mapping file in a later date.
When
you have confirmed all the settings are correct, click “Commit Auto Assign”
button. The machine will be assigned to the designated department determined by
user-department mapping from the mapping file. The system will also show the
number of machine successfully being assigned.
To
do this operation, you must be a “Department Moderator”. A system administrator
or inventory administrator is also a department moderator by default. The
administrator can determine the department(s) that a particular user can
access. This allows any user the access rights to see and manipulate inventory
information only from the authorized departments.
Go
to the administration page. Under “Department” section, click “Authorize User
to Departments” link. Here are the steps to authorize a user to department(s):
5.
You will see the list of users on the left pane.
Select a user to see the existing department(s) that this user is authorized to
access on the right pane.
6.
You may check and un-check any department you
want this user to access. Un-checking any department will prevent access the
user to access the department, and vice versa.
7.
Click “Save” button to save the settings.
8.
The changes will be in effect immediately.
There are a few configurations you or an administrator can
tweak in SAMLite to ensure its internal operations are running smoothly.
Here is the list of supported configurations:
·
System options
·
Configure share folder
·
Configure email notification
·
Configure GeoLocation
settings
·
Configure maintenance
settings
·
Configure machine status
·
Configure inactive machine
deletion
·
Configure database log
truncation
·
Configure database indexes
re-build
·
Manage SAMLite licenses
In this page are the following sections
·
General Settings – for configuring the local
time zone offset
·
Maintenance Settings – for configuring
maintenance settings, like the number of log files to keep.
·
System Logs – for viewing the SAMLite Web
Dashboard system logs
To access this page you must have the “Configuration Manager” role. A system
administrator or inventory administrator has the configuration manager role by
default.
Maintenance Settings
This section allows you to periodically delete old unwanted
logs or data in order to reduce storage usage and/or increase performance.
Application log refers to the SAMLite Web Dashboard log
files. Import service log refers to SAMLite Import Service log files. You can
configure the maximum number of application log and import service log respectively
before older logs are being deleted from the system. For example, you set 20
logs for application log. Thus, when the system detects that there are 21 logs
or more in the log directory, the oldest log will be deleted, leaving the
latest 20 logs to remain in the log directory.
Status History refers to Import History, Machine OS
History, Machine Process History and Machine Event History. Enabling Status
History Maintenance and setting it to 90 days will cause SAMLite to delete all
status history data older than 90 days on a daily basis.
System Logs
This section allows you to view the SAMLite Web Dashboard system
logs. You can use the Max Log Level drop down to set the maximum log detail level.
You can also search for logs or set a time range for the logs.
To configure share folder, you must be a “Configuration
Manager”. A system administrator or inventory administrator is also a
configuration manager by default. The share folder is the folder in which all
incoming inventory file (xml files) from passive collection, active scan and
Microsoft SM/SCCM synchronization will temporary reside. Configuring the share
folder tells the system the path in which Import Service will listen for
incoming xml files for processing.
You might not have created the folder or you might want to use another folder
as the destination of your incoming xml files. Create the folder first by
following the steps below before proceeding with the configuration:
1. Create a folder at any location.
2. Share the folder out with a name. For example,
SAMShare$. The dollar sign ($) appended at the folder share name will hide this
share folder from other users.
3. Give “Everyone” the read and write permission to
this folder under sharing permission and NTFS permission.
4. Test the folder from SAMLite server and other
machine to make sure that the share folder is accessible and writable by
everyone.
Go to the Configuration page. Click “Configure share
folder” link. Here are the steps to configure share folder:
1. Type in the path of your share folder in UNC
format. For example, \\myserver\SAMShare$.
2. Click “Test folder” link to test whether you can
open the share folder from the SAMLite server.
3. Click “Save” button to save your configuration.
Configure email notification
To configure email notification, you must be a
“Configuration Manager”. A system administrator or inventory administrator is
also a configuration manager by default. The Configure Email Notification page
allows configuration of various settings for the Email Notifications for
changes in hardware and software. You can configure the email address and the
schedule in which you want the email to be sent out. There are few settings for
this configuration.
The SMTP Server settings configured here will also be used
for other email notifications (e.g. software expiry notifications, software
category/blacklist notifications).
Go
to the Configuration page. Click “Configure Email Notification” link. Here are
the steps to configure this setting:
1.
Check “Yes” on “Enable Notification” section.
2.
Select the types of hardware and software
changes you wish to be sent to the receiver from “select content to notify”.
3.
Under configure “Configure SMTP Server”, key in
the receiver email address. Set the email priority and check the “Is Body HTML”
if you would like to send the content in HTML.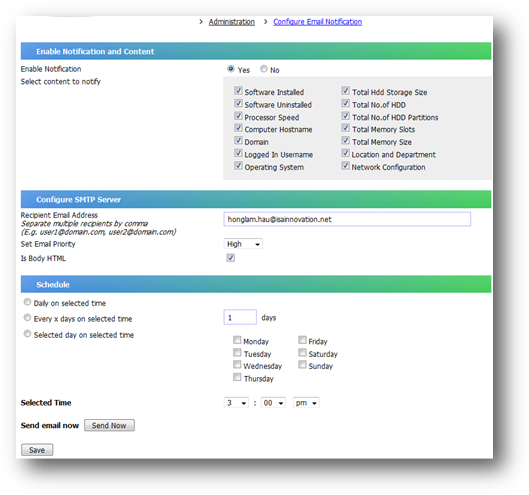
4.
Under “Schedule” section, select your preferred
duration and time of the email to be sent to the receiver.
5.
Click on “Send Now” if you want the email to be
sent instantly.
6.
Click on “Save” button to save your
configurations.
After
you have saved your settings, you try to send an email to the defined receiver
by clicking “Send Now” button. The receiver will receive an email of hardware
and software changes if there is any changes record that haven’t been sent out
before. The emails that have been sent out will not be re-sent again.
To configure GeoLocation settings, you must be a “Configuration
Manager”. A system administrator or inventory administrator is also a
configuration manager by default.
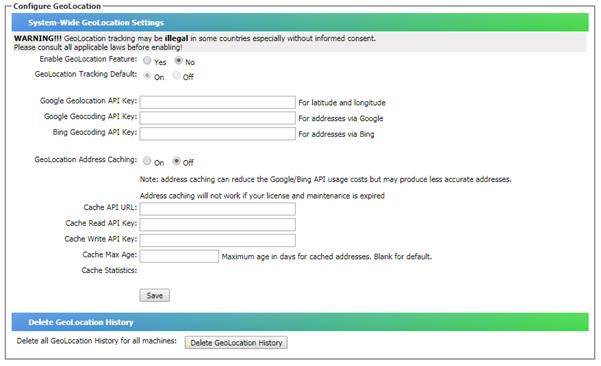
Enabling GeoLocation tracking
In the GeoLocation configuration page you can enable or
disable the GeoLocation feature. Enabling the GeoLocation feature may be
illegal in some countries especially without informed consent of those whose
location information is being gathered.
The GeoLocation Tracking Default controls whether
GeoLocation information is updated by default or not. If it is “Off” then by
default no machine’s GeoLocation information will be updated. If it is “On”
then by default all machines GeoLocation information will be updated. You can
override the default behavior on a per machine basis from the Machine Summary
page.
The Google Geolocation API Key is for getting the latitude
and longitude of machines.
The Geocoding API Keys are for getting the address of
machines from their latitude and longitude.
GeoLocation Address Caching
The GeoLocation Address Caching Configuration section allows
you to enable address caching and specify the URL, keys and age for a
GeoLocation Address Cache. Address caching allows you to reduce the usage of
the Google/Bing API Keys and possibly reduce costs.
GeoLocation caching is only supported if your SAMLite
maintenance is not expired.
Deleting GeoLocation History
In this page you can also delete all GeoLocation History for
all machines.
By enabling this feature, the system will automatically
change machine status to inactive if the machine is outdated for the duration
specified below. This will also enable the system to automatically change
machine status back to active when the machine is updated again. Retired
machine will remain unchanged.
By
enabling this feature, the system will automatically delete machine records
that are inactive/outdated for the duration specified below. Be cautious when
enabling this feature as deleted machines are not recoverable. Retired machine
will remain unchanged.
By
enabling this feature, the system will automatically truncate SAMLite's
database log to remove unnecessary space in the database log. Doing so clears
up server disk space by decreasing log file size, directly help to improve
server and application performance.
By
enabling this feature, the system will automatically re-build SAMLite's
database indexes improve application performance.
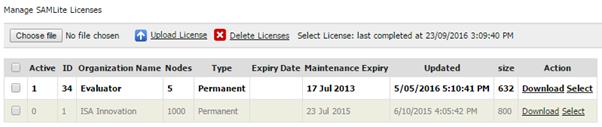
In
this page you can manage the SAMLite server licenses. To upload a SAMLite
license file, click on “Choose file” to pick the file then click on 

Once
the license is uploaded you have to “Select” it to use it. Click on the desired
license’s “Select” link in the “Action” column.

Click
“OK” to confirm you want to use the selected license.

You
should then see the “License selected successfully” and the selected license is
now in bold text.
To
delete licenses from the list of licenses select the desired licenses using the
check boxes as below:
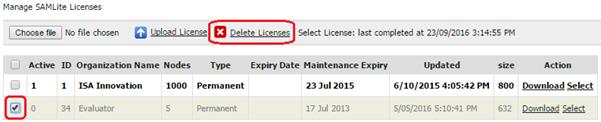
Then
click on “DeleteLicenses”, you should see a confirmation

Click
“OK” to confirm you wish to delete the selected licenses.
As of Build 2.0 there are Software Rules and Categories. The
SAMLite system has a default set of rules which can be changed/customized. When
new software is detected the system will go through the rules and if the
software matches a rule it is assigned to the category and license type
specified by the rule, and the rest of the rules are skipped if the rule has
the “skip rest” directive enabled. Each software can only have one license type
but it can belong to multiple software categories.
Rules are matched by name and publisher case-insensitive
match patterns. Wildcards like % and _ can be specified. The % wildcard
character matches any string of zero or more characters. The _ wildcard
character matches any single character. If there are no wildcards the rule will
only match if the strings are the same.
For example a software item with the name of “ABC1234” will
match the following matches:
a) abc1234
b)
abc123_
c)
ab%
d)
%c12%
e)
%234
f)
Abc%1234
g)
Abc_23%
h) %abc1234%
But it will not match the following
a) abc 1234
b)
abc123__
c)
%abc% %234%
d) abc_1234
Rules are matched in order:

With the above example rules a software item called “VISA
Intranet v2” will match the first rule (#1) and be assigned a license type of
Free, and added to the “Intranet Software” category. Then since “Skip Rest” is
not checked it will also match the second rule (#2) and be assigned a license
type of NonFree and added to the “Content Management” category. A software can
only have one license type but belong to multiple categories. So “VISA Intranet
v2” will only have a NonFree license type, and belong to “Intranet Software”
AND “Content Management” categories.
This page allows you to view and manage blacklist rules.
Software that match these blacklist rules will be assigned to the built-in
Blacklisted category which has notifications enabled by default (however the
email notification schedule and settings have to be configured appropriately first
before email notifications can actually be sent successfully).
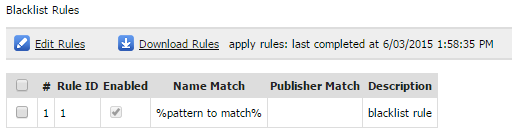
Click on Edit rules to edit the rules. Download Rules to
download and backup the existing Blacklist rules (in text file with a tab
delimited format).

To add a new rule, click on Add Rule.
To edit a specific rule, click on “Edit” in the rule’s action
column, and save to stop editing.
Once you are done with the edits and satisfied click on
“Apply Rules” to save and apply the rules. Your new changes and rules, or any
uploaded rules will NOT be saved if you do not apply the rules
This page allows you to view and manage user software rules.
It is recommended that you create your custom rules here and not the at the
“Manage System Software Rules” page.
Click on Download Rules to download and backup the existing
user software rules.
Click on Edit Rules to edit the rules. Click on Upload Rules
to upload/restore rules.
To add a new rule, click on Add Rule.
To edit a specific rule, click on “Edit” in the rule’s
action column, then save to stop editing that rule. Be sure to enable “Skip
Rest” on a particular rule if you do not want any rules after this rule to
match once a software item matches this rule.

Once you are done with the edits and satisfied click on
“Apply Rules” to save and apply the rules. Your new changes and rules, or any
uploaded rules will NOT be saved if you do not apply the rules
If there are many rules or very many different detected
software applying the rules may take a few minutes and you will see the
following message “Still applying rules to all software, please wait…”:

This is similar to the User Software Rules page except that
this is for System Software rules. It is recommended that you create your
custom rules using the User Software Rules page and not this page, and only use
this to backup system software rules or upload updated system software rules.
This section allows you to manage Software Categories (which
are used by the software rules system). You can create, rename and delete user
software categories (but you cannot rename/delete existing system software
categories – just change their description, disable/enable notification).
This section allows you to configure the Software Category
Notification Schedule. You also need to ensure the SMTP Server setting in
“System Settings, Configure Email Notification” is set and correct.
When configured and enabled, email notifications will be
sent according to the schedule if the system finds machines with software installed
that belong to Software Categories that have notification enabled (in Manage
Software Categories). The email notifications will include an attachment
listing the relevant machines. If no machines are found, no email is sent even
if the scheduled time is reached.
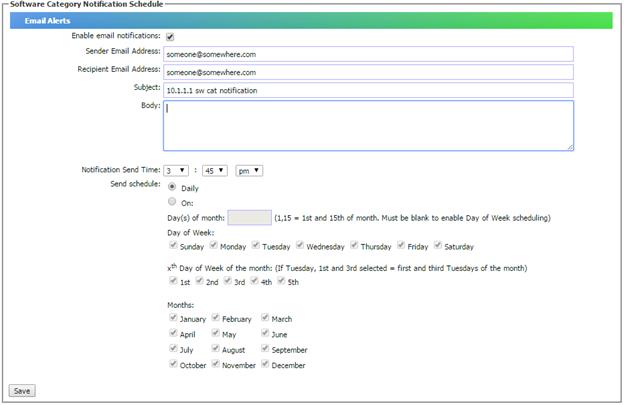
(Note: Software Views are deprecated as of Build 2.0, use
Software Categories and Rules to group software)
You
can create views to group related software into the same category to simplify
your reporting work in SAMLite. Categorizing software view provides you the
ability to filter down your viewing list of software list which is commonly
very long in nature. For example, you can create a view called “Microsoft
Office Applications” to group all of your Microsoft Office products like Office
Word, Excel, Outlook, etc.
There
are built-in four views under SAMLite called Unclassified, Ignore, Authorized
and Unauthorized. By default, all new software will be classified as
Unclassified. There’s no special functions for software that is grouped under
these views, SAMLite create them as the “must have” view in the system.
Software
can be grouped to one or more view. For example, I can add Microsoft Office
Enterprise 2007 into a view called “Microsoft Office Application”. I would also
like to add it to a view called “Authorized” for my reporting need. I might
later add this software to “Microsoft” view where I group all products from
Microsoft into this view.
Supported
view management are as follows:
·
Create new view
·
Modify view details
·
Delete view
·
Add software to view
·
Change software’s view
To
create new view, you must be a “Software View Moderator”. A system
administrator or inventory administrator is also a view moderator by default.
Go
to the administration page. Under “Software View” section, click “Create New
View” link. Here are the steps to create new view:
1.
Under “Create View” section, key in a new name
for your view.
2.
Click “Check Name” to check for view name
availability.
3.
If the name is available to use, you may fill in
the description and click “Create View” button.
4.
The new view is created and can been seen from
“Existing View” list shown on the left pane.
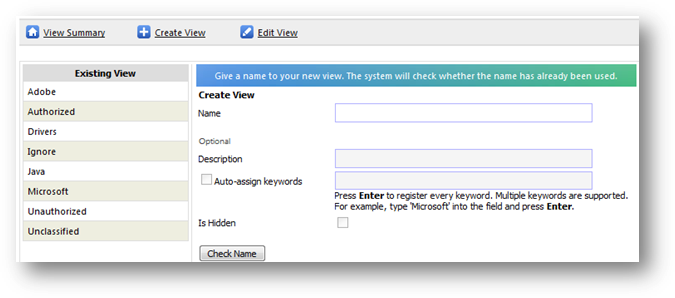
To
modify view details, you must be a “Software View Moderator”. A system administrator
or inventory administrator is also a view moderator by default.
Go
to the administration page. Under “Software View” section, click “Edit View”
link. Here are the steps to edit view:
1.
Select a view from the left pane. The details
will be shown at the right pane.
2.
You may then edit its name and description.
3.
Click “Save” button. The changes will be
reflected immediately.
To
delete views, you must be a “Software View Moderator”. A system administrator
or inventory administrator is also a view moderator by default.
Go
to the administration page. Under “Software View” section, click “View Summary”
link. Here are the steps to delete view:
1.
Check one or more check boxes of the software
you want to delete.
2.
Click “Delete
selected view” to delete your selected views.
3.
All software inside the deleted view will be
re-classified as the default view - Unclassified.
To
add software to one or more views, you must be a “Software View Moderator”. A
system administrator or inventory administrator is also a view moderator by
default.
Go
to the administration page. Under “Software View” section, click “Add
Software’s View” link. Here are the steps to add software to a view:
1.
Select the software you want to assign to a
view. There are two ways to select the desired software. You can use either one
of these options for different situations.
a. Check one or more check boxes of the software that you wish to
assign to a view. Important! You can only select multiple software
titles that are displayed in the list of the same page. You cannot select software
across pages. For example, you have chosen 3 software titles from page 1 of the
software list, and then you click on page 2 to choose 2 other software. If you
do so, those software titles you have selected in page 1 will not be in the
list of software you have selected. When you assign these software titles to view,
only 2 software titles from page 2 will be assigned. Thus, you have to select
software from the same page then assign to a view, then you repeat the same
steps on other pages.
b. Check “Select all software filtered by selected view(s)”. This
option is the simplified way to select all software titles that were previously
assigned to the view(s) that you have selected at view filter. This option is
only suitable to move software from view to another view AND you have filtered
the software list by using the view filter (Filter software by view). For
example, I want to re-assign all software from view OFFICE to OFFICE 2007.
Instead of selecting each check box of my Office’s software, I can firstly
filter my software list to only from Office view. Then I check the “Select all
software filtered by selected view(s)” check box to tell the system that I want
to select all software from my Office view automatically.
2.
Then I click “Select View” button at the top
left of the page to display the list of available views.
3.
Select the target view and click “OK” button to
start to assign software to the target view.
4.
The selected software will be assigned to the
target view in immediate effect.
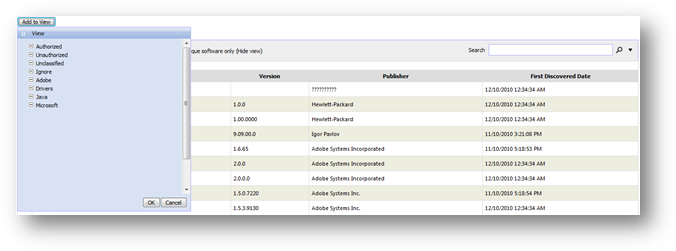
To
change software’s view, you must be a “Software View Moderator”. A system
administrator or inventory administrator is also a view moderator by default.
You can change the view of the software to another view, or remove the software
from your user-defined view. Removing software from all user-defined view or
from other built-in view will group this software back to the view
“Unclassified”.
Change from one
view to another
Go
to the administration page. Under “Software View” section, click “Change
Software’s View” link. Here are the steps to do that:
1.
Select the software you want to change its view.
There are two ways to select the desired software. You can use either one of
these options for different situations.
a. Check one or more check boxes of the software that you wish to
assign to a view. Important! You can only select multiple software
titles that are displayed in the list of the same page. You cannot select software
across pages. For example, you have chosen 3 software titles from page 1 of the
software list, and then you click on page 2 to choose 2 other software. If you
do so, those software titles you have selected in page 1 will not be in the
list of software you have selected. When you assign these software titles to view,
only 2 software titles from page 2 will be assigned. Thus, you have to select
software from the same page then assign to a view, then you repeat the same
steps on other pages.
b. Check “Select all software filtered by selected view(s)”. This
option is the simplified way to select all software titles that were previously
assigned to the view(s) that you have selected at view filter. This option is
only suitable to move software from view to another view AND you have filtered
the software list by using the view filter (Filter software by view). For
example, I want to re-assign all software from view OFFICE to OFFICE 2007.
Instead of selecting each check box of my Office’s software, I can firstly filter
my software list to only from Office view. Then I check the “Select all
software filtered by selected view(s)” check box to tell the system that I want
to select all software from my Office view automatically.
2.
Then I click “Change View” button at the top
left of the page to display the list of available views.
3.
Select the target view and click “OK” button to
start to re-assign the software to the target view.
4.
The selected software will be re-assigned to the
target view in immediate effect.
Remove software’s
view
Go
to the administration page. Under “Software View” section, click “Change
Software’s View” link. Here are the steps to do that:
1.
Click of
the software on which you want to remove its view.
2.
Alternatively, check one or more check boxes of
software from the list, then click “Remove
selected software’s view”.
SAMLite collects a list of inactive user accounts that
reside in every user machine. You can perform various actions on these inactive
user accounts such as to disable user accounts that have not been login for a
specific period of time. This list of dormant user accounts is collected when
you scan the target machine through SAMLite collection method like active scan
or login script.
You can view the list of dormant user account by doing the
following:
Go to the administration page. Under “Dormant User Account Management” section,
click “Dormant User Accounts” link.
Filtering
You may perform filtering on this page. The types of filter
are described below:
1.
Filter by account status
a.
You can filter the list to
display accounts that are active or disabled, or both.
2. Filter by exemption
a.
You can filter the list to
display accounts that are exempted or not exempted from any action, or both.
b.
Exemption list is a list of
user accounts that you would like the system to exclude from automatic
disabling. This list is uploaded by you in the form of a CSV file. For more
information on exemption list, refer to exemption list section.
3. Filter by department
4.
Filter by location
Actions
You may perform action on the target user accounts. Proper
configuration is required when installing Active Probe to ensure Active Probe
has sufficient rights to make changes to the target machine.
Follow steps below to configure Active Probe from IIS
level. If you do not have expertise in configuring IIS, please consult your
administrator to configure this for you.
1.
Application Pool Identity
a.
Set the identity user
account to an account that has administrative rights on all target machines.
b.
By default the system will
use Network Service or Local System as the identity for new application pool.
You can create a new application pool and set the identity of the pool to a
domain administrator account or any account which has administrative rights on
all of your target machines.
The types of actions are described below:
1.
Disable account
a.
You can select one or more
user account by selecting the checkbox beside the user account record, and
click the “Disable Account” button. Click Ok on the confirmation prompt and the
system will instantly try to connect the machine via active probe and disable
the user account in the machine.
2. Enable account
a.
You can select one or more
user account by selecting the checkbox beside the user account record, and
click the “Enable Account” button. Click Ok on the confirmation prompt and the
system will instantly try to connect the machine via active probe and enable
the user account in the machine.
3. Disable all dormant user account of more than x
days
a.
This is a convenient link
for you to immediately disable all dormant user accounts that are inactive for
more than the number of days you have set under “Disable user account after”
setting in Configure Auto User Account Remediation.
All these actions will only be available if you have added
at least one active probe and set at least one credential under the active
probe configuration page.
The system will log the transaction when you disable or
enable a user account via the dormant user account management page. For a
successful operation, the system will log it under the Success log, while the
failed ones will be logged in Error log.
Success Log
Go to the administration page. Under “Dormant User Account
Management” section, click “Remediation Success Log. In the success log, you
can re-enable user accounts by doing the following:
1.
You can select one or more
user account by selecting the checkbox beside the user account record, and click
the “Enable Accounts” button. Click Ok on the confirmation prompt and the system
will instantly try to connect the machine via active probe and enable the user account
in the machine.
Error Log
Go to the administration page. Under “Dormant User Account
Management” section, click “Remediation Error Log. In the error log, you do not
have any action on the user account from the console page. However you need to
take action on why the failure occurs. The errors that are shown in that page
are typically caused by the following:
1.
The target machine is not
turned on.
2. Target machine’s Windows firewall is turned on
and is preventing SAMLite active probe from accessing it. The configuration
needed for disable and enable user account are the same configuration that the
active scan requires for a successful data collection.
3.
Some other security
restriction imposed by your network or system administrator to reach and to
make changes to the target machine.
Exemption list is a list of user accounts that you would
like the system to exclude from automatic disabling. This list is uploaded by
you in the form of a CSV file.
Go to the administration page. Under “Dormant User Account
Management” section, click “Upload Exemption List”.
File format
The file must be in CSV format. You can save a file as CSV from
a Notepad or a spreadsheet application like Microsoft Office Excel.
The order of your data is significant. The first data must
be the IP address of the machine. The second data must be the machine hostname.
The third data must be the login name. All data are separated by a comma (,).
<IP ADDRESS>,<MACHINE HOSTNAME>,<LOGIN
NAME>
For example:
192.168.1.122,SVR01,mydomain\adam
Upload into the system
To upload an exemption list, click on “Choose File” button
and select the CSV file that contains your exemption list. Click “Upload”
button will initiate the upload process from the SAMLite server to SAMLite
database. The exemption list will be shown in the page.
You can set how many days before a user account will be
disabled automatically by SAMLite active probe.
Go to the administration page. Under “Dormant User Account
Management” section, click “Remediation Settings”.
Each of the settings is described below:
1. Enable auto remediation for dormant user account
a.
If you set this setting to
Yes, the system will automatically disable user accounts via active probe using
the rules you have set in this configuration page.
b.
If the setting is No, no
automation on user account will be allowed.
2. Disable user account after x days
a.
You set how many days before
a user account can be disabled. This setting must be set.
3. Exception keywords
a.
This is different from the
exemption list that you can upload into the system.
b.
This is a general wild card
that tells the system to not act on any user accounts that contain these
keywords.
c.
The system will skip login
name that has any of the following keywords. Separate each keyword with a comma
(,).
4. Last auto run date
a.
Tells you when is the last
date and time automation (if you set it to Yes) is run.
When you made any changes to the configurations, click
“Save” button to save your changes. The changes will take effect immediately.
A custom
field is additional information that you can attach to either a machine or
software. You can define as many custom fields as you like, and then you can
put a value into the field for each machine. Once a custom field is created,
that field will be available to all machines or software. Custom fields are
defined separately for machine and software. Those created for machines cannot
be used for software. For example, you can create a machine custom field called
“Asset Tag”. Then key in each machine’s Asset Tag ID in its “Asset Tag” custom
field.
To
manage machine custom field, you must be a “Machine Custom Field Moderator”. A
system administrator or inventory administrator is also a machine custom field
moderator by default.
Add custom field
Go
to the administration page. Under “Custom Field” section, click “Manage custom
field” link. Here are the steps to do that:
1.
Click “Add Custom Field” link at the top of the
page.
2.
Under section “Machine custom fields”, key in a
name for your custom field and click “Check Name” for the system to check for
name availability.
3.
Optional*. You may fill in the registry path and
registry key to auto populate the machine’s custom field value during machine
update.
4.
Click “Create” button to create the custom
field.
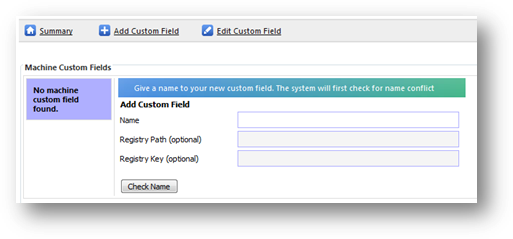
Edit custom field
Go
to the administration page. Under “Custom Field” section, click “Manage custom
field” link. Here are the steps to do that:
1.
Click “Edit Custom Field” link at the top of the
page.
2.
Under section “Machine custom fields”, select a
custom field from the left pane. The selected custom field’s details will be
shown at the right pane.
3.
You may then make any changes to the details.
4.
Click “Save” button to save the changes.
Delete custom field
Go
to the administration page. Under “Custom Field” section, click “Manage custom
field” link. Here are the steps to do that:
1.
Click “Summary” link at the top of the page.
2.
Under section “Machine custom fields”, check the
check box of the custom field you wish to delete.
3.
Click “Delete” button to delete the selected
custom field. All values that were previously defined on all machines will be
deleted from the system as well.
To
manage software custom field, you must QA
be a “Software Custom Field Moderator”. A system administrator or inventory
administrator is also a software custom field moderator by default.
Add custom field
Go
to the administration page. Under “Custom Field” section, click “Manage custom
field” link. Here are the steps to do that:
5.
Click “Add Custom Field” link at the top of the
page.
6.
Under section “Software custom fields”, key in a
name for your custom field and click “Check Name” for the system to check for
name availability.
7.
Optional*. You may fill in the registry path and
registry key to auto populate the software’s custom field value during machine
update.
8.
Click “Create” button to create the custom
field.
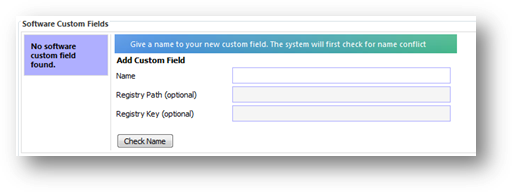
Edit custom field
Go
to the administration page. Under “Custom Field” section, click “Manage custom
field” link. Here are the steps to do that:
5.
Click “Edit Custom Field” link at the top of the
page.
6.
Under section “Software custom fields”, select a
custom field from the left pane. The selected custom field’s details will be
shown at the right pane.
7.
You may then make any changes to the details.
8.
Click “Save” button to save the changes.
Delete custom field
Go
to the administration page. Under “Custom Field” section, click “Manage custom
field” link. Here are the steps to do that:
4.
Click “Summary” link at the top of the page.
5.
Under section “Software custom fields”, check
the check box of the custom field you wish to delete.
6.
Click “Delete” button to delete the selected
custom field. All values that were previously defined on all software will be
deleted from the system as well.

This feature allows you to update many machines with details
like Department, Warranty Expiry Date and Lease Expiry Date. Even Machine
Custom Fields can be updated.
To update you need to upload a tab-delimited text or CSV
file where the first line is a row containing the machine column names. And all
the lines after are rows containing the data for each machine.
Example:

The second line above will update
computers that have the Computer Name 'MY-ANS-PC123' and BIOS Serial
Number 'AZXGH0012513FJ5R' to have Company='MyCo1', Department='Helpdesk',
Assigned User='Ramesh Krishnan' and so on.
And computers named 'AU-HR-PC5' with BIOS Serial Number 'AZXGH0243303SJ4K'
will be set to Company='AuCo1', Location='Sydney L2' etc.
Columns like 'Assigned User' and 'Monitor Vendor' are examples of Machine Custom Fields that you can create.
|
Match columns
|
BIOS Serial Number,
Computer Name, Enclosure Asset Tag, Enclosure Serial Number, Machine ID,
Motherboard Serial Number
|
|
Updatable columns
|
Comment, Company, Company
ID, Department, Department ID, Description, Lease Expiry Date, Lease Start
Date, Location, Location ID, Ownership Information, User Defined Role, Vendor
Information, Warranty Expiry Date, Warranty Start Date and any Machine Custom
Fields
|
Match columns are columns that can be used to select a
machine to be updated. If the match columns data match more than one machine,
the import process will be aborted. For example if a row has Computer Name =
PC123 and there are three machines with that computer name (PC123) then the
import process will fail. To avoid this you can specify more match columns or
select the option to skip the update (and update those machines manually) or
select the option to update multiple machines.
- Create or open an
Excel spreadsheet with the first row containing the column names and the
data in the other rows.
Example: 
- Choose File->Save As from the menu.
- In the 'Save as
type' dropdown, select 'Text (Tab delimited) (*.txt)'
- Click on the 'Tools'
dropdown at the bottom near the save button and select 'Web Options'
- Select the 'Encoding'
tab.
- In the 'Save
this document as:' dropdown, select 'Unicode (UTF-8)'
- Click OK, then specify the file
name and click Save.
- Create or open an
Excel spreadsheet with the first row containing the column names and the
data in the other rows.
Example: 
- Choose File->Save As from the menu.
- In the 'Save as
type' dropdown, select 'CSV (Comma delimited) (*.csv)' and
click Save.
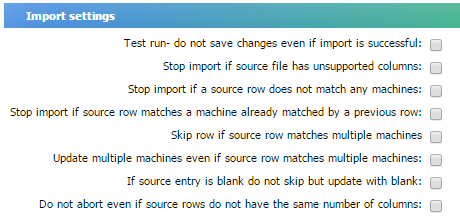
Use the “test run” option to test an import just in case
something unexpected happens (like many multiple machine updates). When “test
run” is selected additional logging is done.
“If source entry is blank do not skip but update with blank”
does not apply to Department, Company, Location and their related columns – if such
items are left blank they will be ignored.
To detect and abort if there are duplicates select the “stop
import if source row matches a machine already matched by a previous row” and
leave unchecked the “skip row if source row matches multiple machines” and also
the “Update multiple machines even if source row matches multiple machines”.
Difference between a normal import and a test run import.
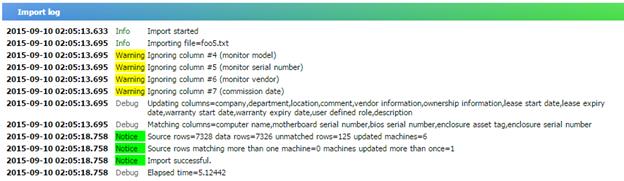
The test run logs a bit more:
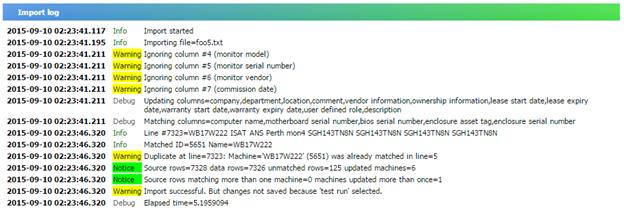
If there are too many lines the log will be truncated.
Note that some source columns are being ignored (e.g.
monitor model). The Bulk Import feature does not automatically create new
Machine Custom Fields, or new Departments, Companies and Locations. You have to
create these if necessary.
Example of an error
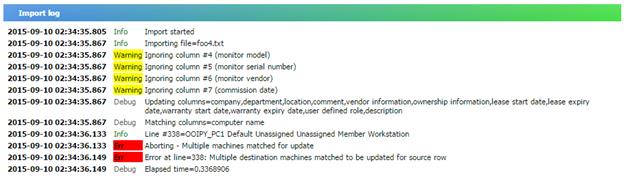
In the above log, the import was aborted due to multiple
machines matching OOIPY_PC1.
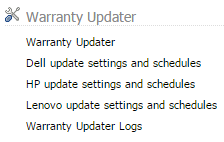
Build 2.1 now allows machine warranty information to be automatically
updated on an immediate or scheduled basis.
Current supported vendors are: Dell, HP Inc., Hewlett
Packard Enterprise and Lenovo (which includes IBM x86 servers). However vendors
like Dell and HP Inc. require API keys to enable warranty queries. You or your
organization will have to apply to those vendors to get the keys and go through
their approval processes.
In this page you can enable/disable querying globally. You
can change the “Immediate Update” settings and perform “Immediate Update”
queries on selected machines.
There is a different settings and schedule page for each
supported vendor group.
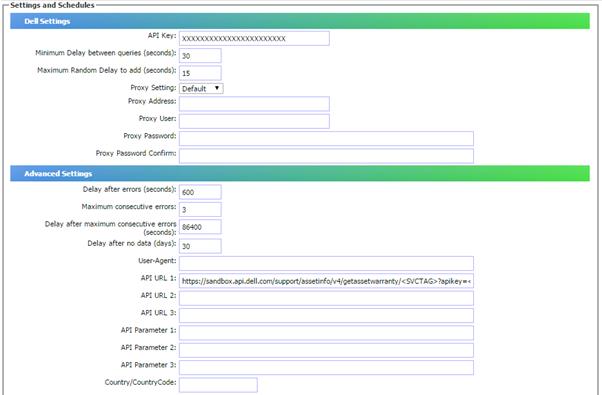
In the Settings section you can specify the API Key and
other settings like the delay between queries, the delay after errors and so
on. It is recommended that you only change the API Key, API URL and Proxy
settings if necessary. The rest of the settings should be left blank for the
defaults which should be fine for normal situations. Click on the “Advanced
Settings” title bar to expand or collapse the Advanced Settings section.

In the Schedule (non-overwriting and overwriting) sections
you can specify schedules for when automated queries are to be done for each
Vendor. The non-overwriting schedule will only query for machines that do not
already have warranty information. The overwriting schedule will query even if the
machines already have warranty information (and overwrite the existing warranty
information).
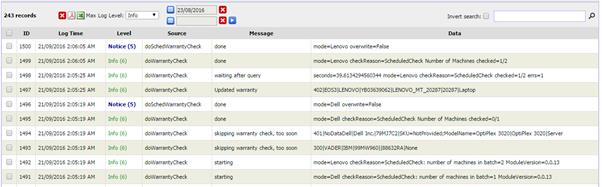
In this page you can view the Warranty Updater logs to see
if the warranty queries are OK or if there are errors. You can specify the “Max
Log Level”, date ranges and search strings. Select “Invert search” to search
for records that do NOT contain the search string.
Logs can be exported in an Excel readable format.
Scan Agents can be downloaded, installed and used for
performing SNMP queries on other devices. The SNMP query results can update
attributes of “Other Assets”. For example the toner and page counts for
printers or the lamp hours for projectors.
A Scan Agent can also be used to scan the machine it is
installed on- this is called a Local Scan. The scan results are similar to
those from a normal SAMLite scanning script.
Note: the Scan Agent feature requires the SAMLite license
and maintenance to not be expired.

On this page you can build and download the Scan Agent
installer.
A Handler URL must be configured before you can download the
Scan Agent installer.
Click on the Build/Rebuild button to build the installer.
Click on the file name to download the installer.
If a new version of the agent is available the build button
may show a different version number from the version available to be
downloaded. You can either download the existing version or click on the Build
button to replace the existing version with a new build.
The SHA256 text is the hash that uniquely identifies the
installer file. This hash can change after a rebuild even for the same version.
To update the agent you will need to upload the latest AgentTemplate
file using the Manage Scan Agents, Scan Agent Settings section.
Scan Agent Settings
This section allows you to upload an AgentTemplate
file which is used to build the Scan Agent Updater and configure the Updater
URL. You can also configure the Scan Agent polling interval and the handler
URLs. The polling interval controls how often the Scan Agents try to contact
the Agent Handler via the Handler URLs. The Scan Agent will try the URL that
last worked and if that fails it will try the URLs one by one in the specified order.
Replace http://TheSAMLiteServer with the protocol and
address of your SAMLite server. For example you might have one URL for internal
access and a different one for external access. The second line with https://SAMLiteServerPublicAddress/…
is an example for the case where the SAMLite server is accessible from the
Internet via a public address. You only need to specify one URL If your SAMLite
server is only to be accessed via one URL.
The Agents will try to update themselves when they contact
the SAMLite server and their version is older than the available updater
version.
Click the Save button to save the settings.
To configure the Local Scan Schedule click on the  to
expand the section.
to
expand the section.

You can then configure the Local Scan Schedule. If enabled,
a Local Scan is done when the Scan Agent contacts the server and the scheduled
time has passed AND the scheduled time is later than the time the last scan was
done. If no scheduled times are specified the Scan Agent will do a scan once a
day.
Click the Save button to save the settings.
Scan Agent List

This shows the known Scan Agents and some information.
Scan Agent Tasks
This is a list of recent Agent tasks. This can be used for
troubleshooting Scan Agent and SNMP query issues.